
Magento 2 / Adobe Commerce
Documentation for setting up Pixlee on your Magento 2 / Adobe Commerce stores
Installing the Pixlee UGC Magento 2 Extension
Magento extension installation instructions
Install the extension using one of the two below methods. Installing using composer is the recommended method.
Install extension using Composer (recommended)
On your Magento server, run the following commands to install the extension using composer.
composer require pixlee/magento2
bin/magento module:enable Pixlee_Pixlee --clear-static-content
bin/magento setup:upgrade
bin/magento setup:di:compile
bin/magento cache:clean
Installing Hyvä Theme Compatibility Module (optional)
This step is only needed if you are using Hyvä Theme Magento 2 frontend extension.
If you are using the Hyvä Theme frontend, there is a compatibility module for the Pixlee UGC extension. It is recommended to install the extension via Composer. If unable to use Composer, use the install instructions in the magento2-pixlee Gitlab repository.
- Install via composer
composer require hyva-themes/magento2-pixlee - Enable module
bin/magento setup:upgrade
Install extension in app/code (alternative to using Composer)
- Download the extension Source Code (zip) for the latest release from https://github.com/pixlee/magento2/releases.
- Open up a command prompt. If you are using Windows, this can be done using Run (CTRL + R) and typing in 'cmd'. If your are using a OSX, open up the spotlight search using CMD + SPACE and type in 'terminal'.
- Log into the Magento server and navigate to your Magento 2 folder using command prompt or terminal.
- Extract the contents of the zip file downloaded in the previous step in your Magento 2 folder's app/code directory. Rename the extension base directories to Pixlee/Pixlee and verify that the directory structure looks like <Your Magento 2 directory>/app/code/Pixlee/Pixlee.
- Run the following commands
bin/magento module:enable Pixlee_Pixlee --clear-static-content
bin/magento setup:upgrade
bin/magento setup:di:compile
bin/magento cache:clean
Update extension using Composer
On your Magento server, run the following commands to update the extension to the latest version using composer. Running composer require may update the major version and implement breaking changes. To prevent breaking changes and adhere to the composer.lock version restrictions, use composer update pixlee/magento2 instead.
composer require pixlee/magento2
bin/magento setup:upgrade --keep-generated
bin/magento setup:static-content:deploy
bin/magento cache:clean
Configure the Pixlee UGC Magento 2 Module
Before we can start using the plugin, we need to configure it in the Magento Admin.
Log in to the Magento 2 Admin Panel and select Stores on the left navigation menu and click on Configuration.
Older extension versionsFor extension versions before 2.0.0, you must select the website in the Store View dropdown. The Pixlee Tab will not appear in Default Config.
On the Configuration page select Pixlee on the left navigation menu and click on UGC. You will be redirected to the Pixlee UGC Settings page.
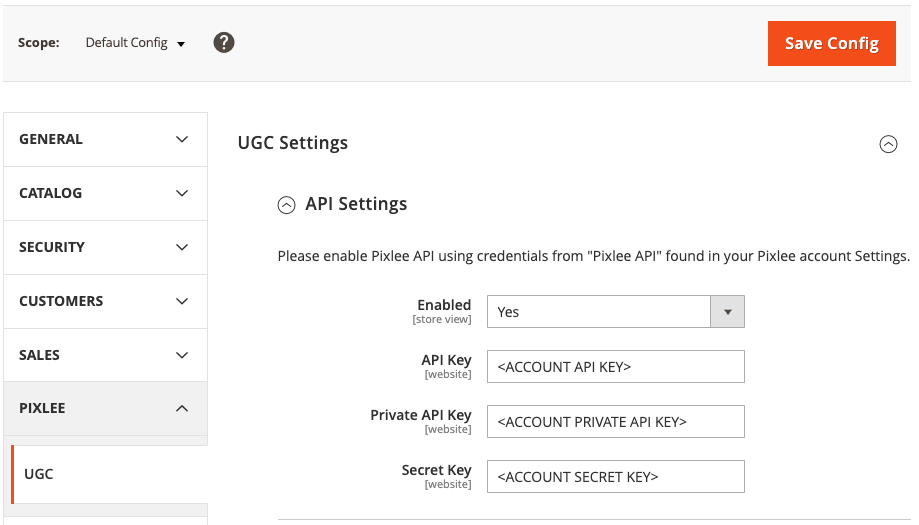
Pixlee UGC API Settings
- Set Enabled to Yes to enable the Pixlee UGC extension
- Fill in the API Key, Private API Key, and Secret Key from your Pixlee account to connect to the Pixlee API
- You will need to get the API Key, Private API Key, and Secret Key from your Pixlee account API settings. Getting your API Keys
- Click Save Config on the top right corner of the page to save your Pixlee UGC Settings.
Using multiple Pixlee accountsThe API keys used will determine which Pixlee account the extension will connect to. If you have multiple websites that you wish to have connected to separate Pixlee accounts, you will need to select each websites in the Store View dropdown and set the appropriate Pixlee API keys for each website.
Exporting Products from Magento 2 to Pixlee
The Magento product catalog must be uploaded to Pixlee in order to complete the extension setup. A Magento product export can be manually triggered any time via the Export Products to Pixlee button located in the Pixlee UGC Settings. This method should be used during initial setup in order to ensure all products are exported to Pixlee. A nightly cron job also exports all products for enabled websites on a daily basis to ensure products are synced. Any time a product is created or updated, the update product information is sent to Pixlee, so a manual export is not required when updates are made.
Product Export Button
Product exports can be immediately run a product export at any time using the Export Products to Pixlee button. Clicking the export button in the Default Config scope will export products for all enabled websites. If you only wish to export a single website, you can select the website from the Store View dropdown and click the button in the website settings.
- Log in to the Magento 2 Admin Panel and select Stores on the left navigation menu and click on Configuration.
- Click the button labeled Export Products to Pixlee in order to immediately run a product export at any time. This process may take a while for large catalogs.

Product Export Button
You can export your Magento 2 products to Pixlee at any time from the Export Products to Pixlee button on the Pixlee Account Settings page.
Max execution timeIf you have ever changed the max_execution_time variable for Magento, please ensure that it is set to at least 3600 seconds (1 hour). The default should be 18000 seconds, which is fine to leave alone.
Nightly Cron Product Export
The extension creates a new cron job that runs nightly at 3am UTC to export all products for enabled websites. This job ensures product data stays up to date in Pixlee. In order to modify the export time, a developer will need to modify the etc/crontab.xml to change the schedule.
Older extension versionsFor extension versions before 2.0.0, only products for website 1 are exported by the nightly cron export.
Since version 2.1.0, it is possible to disable the nightly cron job for any or all websites by setting Enable Nightly Export to No.
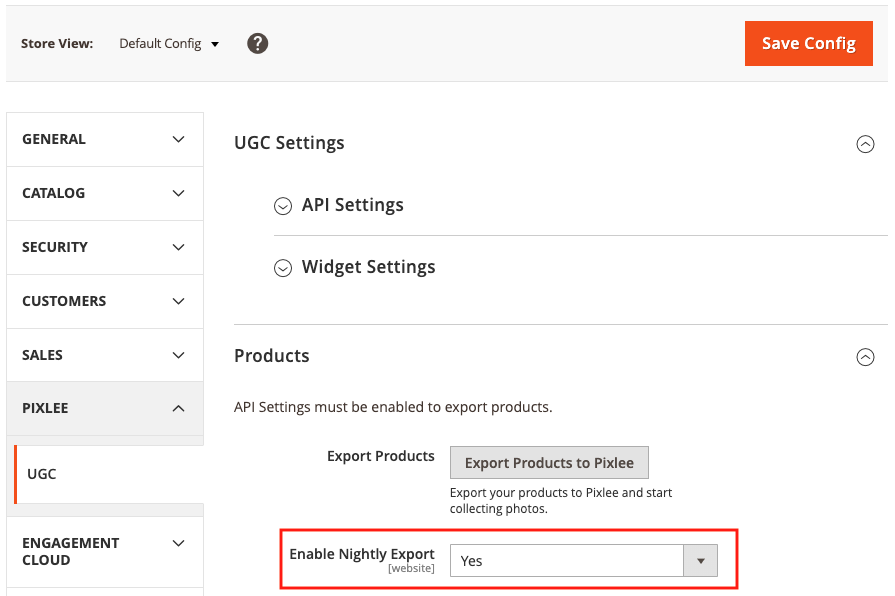
Enable Nightly Export Cron Job
Analytics
Enabling the API Settings and adding the keys automatically enables analytics. Javascript will be added to the frontend to send addToCart events. When orders are placed, checkoutSuccess events are sent from the backend. See Testing Pixlee API Calls for more details.
Embedding Widgets on your site
After exporting all products to Pixlee, you can create and embed Widget on your site. The extension will automatically add the embedded code to you category and/or product page for the widget IDs you set in the Magento configuration.
Create PDP and CDP Widgets in Pixlee
- Log in to http://app.pixlee.com, and navigate to the Publish Center tab.
- Publish a new PDP Display or click edit for an existing display and customize the widget as you wish.

- Click the Generate Embed Code button and you'll be presented with an embed code with the accountId and widgetId. Note - We recommend that you leave the "Load Priority" setting to "Low priority" when customizing.

- Repeat the above steps for additional widgets as desired.
Embedding a PDP Widget on your Product Page
- Go to Pixlee UGC Widget Settings in the Magento admin
- Log in to the Magento 2 Admin Panel and select Stores on the left navigation menu and click on Configuration and then select Pixlee and UGC from the menu.
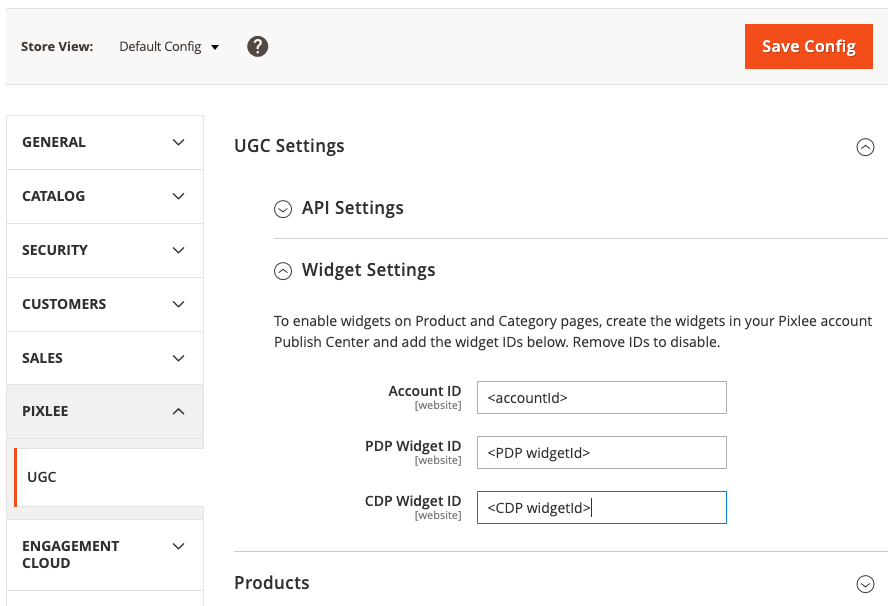
- Copy the values for accountID from the embedded code generated for the widget in the section above and paste it into the Widget Settings Account ID field in Magento.
- To enable the PDP Widget, paste the widgetId into the PDP Widget ID field.
- Click Save Config on the top right corner of the page to save your UGC Settings.

Pixlee UGC Widget Settings
Once enabled, the widget will be displayed on the PDP at the bottom of the product media for any product that has tagged photos in its Pixlee album.

Edit and Customize PDP Widget
Widget customizations can be made using Pixlee's Design Editor in your Pixlee account. Once changes are made, re-publish the PDP widget and update PDP Widget ID in the Magento Widget Settings with the resulting widgetId.
To customize positioning of the widget on the page, a custom catalog_category_view.xml layout file should be created to override the extension layout. https://developer.adobe.com/commerce/frontend-core/guide/layouts/override/
Embedding a CDP Widget on your Category Pages
- Go to Pixlee UGC Widget Settings in the Magento admin
- Log in to the Magento 2 Admin Panel and select Stores on the left navigation menu and click on Configuration and then select Pixlee and UGC from the menu.
- Copy the values for accountID from the embedded code generated for the widget in the section above and paste it into the Widget Settings Account ID field in Magento.
- To enable the CDP Widget, paste the widgetId into the CDP Widget ID field.
- Click Save Config on the top right corner of the page to save your UGC Settings.
Pixlee UGC Widget Settings
Once enabled, the widget will be displayed on the top of the category page for any category that has products with tagged photos in its Pixlee album.

Edit and Customize PDP Widget
Widget customizations can be made using Pixlee's Design Editor in your Pixlee account. Once changes are made, re-publish the CDP widget and update CDP Widget ID in the Magento Widget Settings with the resulting widgetId.
To customize positioning of the widget on the page, a custom catalog_product_view.xml layout file should be created to override the extension layout. https://developer.adobe.com/commerce/frontend-core/guide/layouts/override/
Clearing the Magento 2 Cache and Cache Storage
Log in to the Magento 2 Admin Panel and select System on the left navigation menu and click on Cache Management.
Check the box next to the caches you wish to clear and click Submit to clear individual caches or click on Flush Magento Cache to clear all caches.

Magento Cache Management
Testing and Troubleshooting
To test that everything was implemented correctly, we need to check two things
- Were all the products exported?
- Are API calls being successfully made to the Pixlee API?
Testing Product Export
- Ensure product export has run at least once. Manually export products
- Login to Pixlee and navigate to Products under the Album tab. Alternatively, click this link. where you will see a list of products.

-
Search for a few products on this page that you know exist in your catalog to ensure they are present.
-
In case the list is empty or you were not able to search for a particular product, proceed to troubleshooting. Otherwise, proceed to Testing Pixlee API Calls
Troubleshooting Product Export
There are a few things that could cause the product export to fail. We need to determine the exact cause of the failure.
Finding Logs
The Pixlee Product Export job logs the jobs progress and all exceptions to the application logs. So the next step for us is to get the both Magento application logs and the server PHP logs.
- Navigate to the log directory and look for the pixlee.log file. The Magento application logs are usually located at $Magento_Root$/var/log.
- For the PHP logs location, it depends on your setup. For example, if you're using Apache the logs should be in $Apache Root$/logs. We're looking for the file named php_error.log in this directory.
PHP Errors
Lack of Allocated Memory
One of the most common issues that we encounter is a lack of allocated memory to the Magento or PHP/Apache server. Open the php_error.log file using your favorite text editor and search for a log entry similar to the following line
Allowed memory size of 33554432 bytes exhausted (tried to allocate 43148176 bytes) in PHPIf you find a similar looking error, please increase the allocated memory and run the product export job again.
Max Execution Time
Another common issue is a low setting for the max_execution_time. Look for a log entry similar to the following
Fatal error: Maximum execution time of XYZ seconds exceeded in ...If you found a similar log entry please increase the max_execution_time setting inside your php.ini file to at least 3600. And then try exporting the products again.
If at this point you're still not able to see any products exported to Pixlee, please contact us here and attach the both pixlee.log and php_error.log to the request.
Testing Pixlee API Calls
API calls are made to Pixlee API when a customer adds something to their cart and after an order is placed successfully. We need to make sure that these calls are being made at the right time.
Add to Cart
- Open your favorite browser and open a product page of your store. And click Add to Cart.

-
Open the pixlee.log file located at $Magento_Root$/var/log using your favorite text editor and scroll down to the very end.
-
There should be an entry beginning with AddToCart

- If you found the AddToCart calls then your analytics were integrated correctly. If not, contact us here and attach the pixlee.log file to the request.
Checkout Success
- Switch back to the browser and proceed to checkout and buy the product that you added to cart previously. Use a test payment method for the checkout.
- When you reach the order confirmation page open the pixlee.log file again and ensure that you are viewing the latest copy of the file.
- This time look for log entries beginning with CheckoutSuccess

- If you do not see the CheckoutSuccess calls like in the screenshot, please contact us here and attach the pixlee.log file with the request.
Disclaimer: Mobile AnalyticsBased on the design of Magento2, user agents are not passed along the add to cart and conversion events. This means that there is no current ability to split between mobile and desktop conversion data.
Manually adding widget code using RequireJS
The extension will automatically add the widget javascript to the page if the widget IDs are set in the Pixlee UGC store configuration. However, if you wish to use the generated embed code, you must modify the script to use RequireJS.
- Get the generated embed code from the Pixlee Publish Center

- Modify the script to use the require() function
- Use the require function and add the asset.pixlee.com url as a parameter.
- Move the JavaScript code in the window.PixleeAsyncInit function to the require function's callback.
- Call the Pixlee.resizeWidget() function at the end of the callback.
The new code should look like this:
<div id="pixlee_container"></div>
<script type="text/javascript">
  require(['https://assets.pxlecdn.com/assets/pixlee_widget_1_0_0.js'], function() {
      Pixlee.init({apiKey:'YOUR_API_KEY'});
      Pixlee.addSimpleWidget({widgetId:YOUR_WIDGET_ID});
      Pixlee.resizeWidget();
    }
  );
</script>
Updated 8 months ago