
Shopify
Documentation for adding Emplifi's Pixlee TurnTo Social UGC to your Shopify store
Migrating an Existing AccountDo not install and configure the UGC Shopify app without contacting your Customer Success Manager or support if your Emplifi UGC account is already connected to another e-commerce integration or uses a custom product feed.
The Shopify integration uses different product identifiers that may not match your existing product catalog. As a result, products may not be linked correctly, and a product migration may be required to ensure Shopify product updates are applied to the correct existing products.
Browser Compatibility NoticeFirefox currently has compatibility issues with the installation of the plugin. For the purpose of the below instructions, we recommend Chrome or Safari instead. Also make sure your browser settings allow cross site scripting and third party cookies in order to access the app (this situation usually only occurs for Safari).
Prerequisites for Safari
- Make sure that cross site tracking is enabled:
- Open Safari preferences.
- Navigate to the Privacy tab.
- Make sure “Prevent cross-site tracking” is not selected.

- Make sure to disable cross origin restriction:
- First make sure the develop option appears on your menu bar.
- Open Safari Preferences.
- Go to the Advanced tab and select “Show Develop menu in menu bar”.
- Go to the Develop tab in your menu bar and select “Disable Cross-Origin Restrictions”.

Install Emplifi's Pixlee TurnTo Social UGC app to your Shopify Store
In order to add order to add UGC content and analytics to your Shopify store, you will need to install the Pixlee TurnTo Social UGC Application in your Shopify store.
- Log into the Shopify admin panel for your Shopify store
- Search for the Pixlee TurnTo Social UGC Shopify app
- Click install in the app listing and then install the app in your store admin

- Click Install app in your store admin
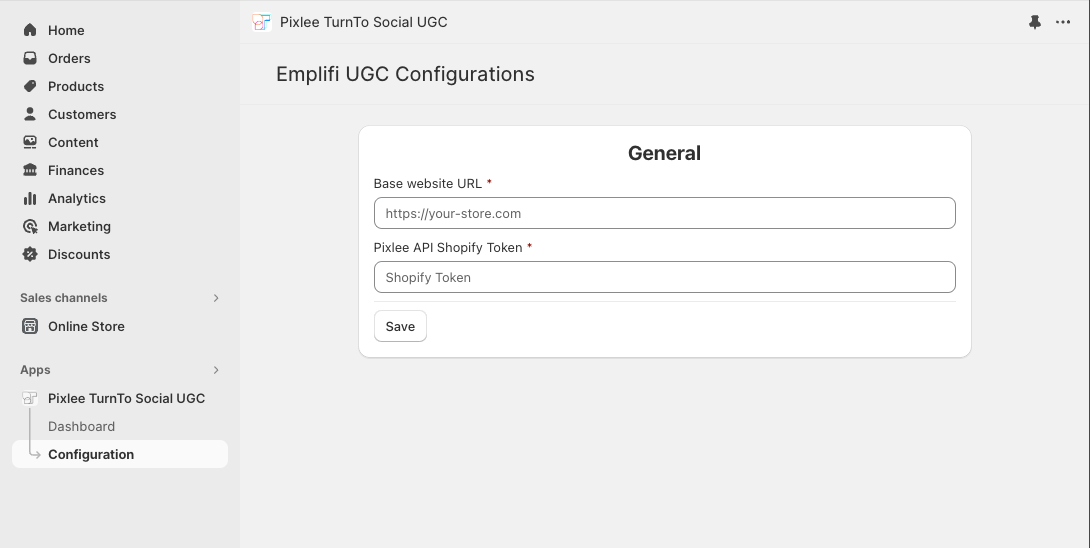
Configuring your Pixlee TurnTo Social UGC app
Once the app is installed, you will need to enter your credentials in the app configurations in order to connect to your Pixlee account.
Do not configure the UGC Shopify app without contacting your Customer Success Manager or support if your Emplifi UGC account has imported products from another e-commerce integration or custom product feed.
-
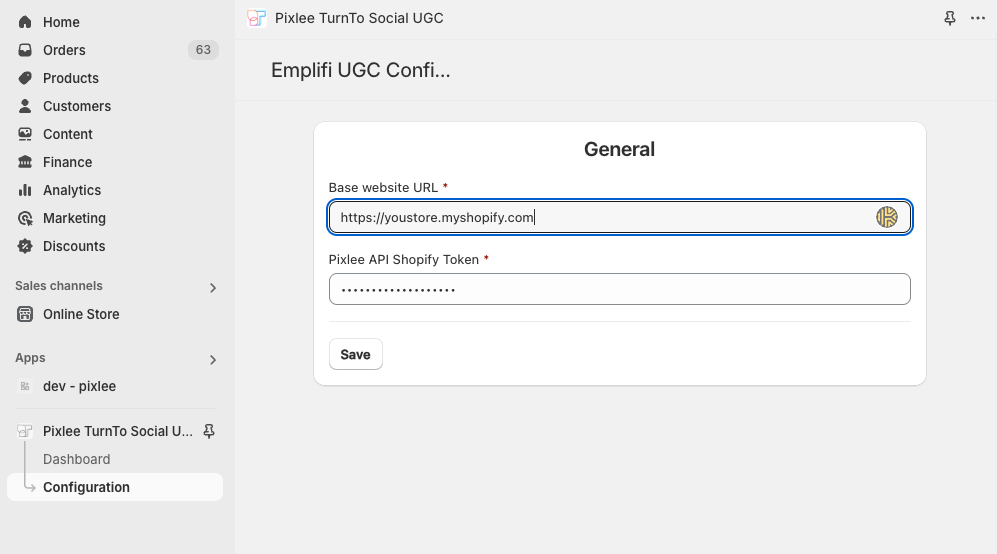
Open the Pixlee TurnTo Social UGC app in your Shopify store which should open to the app configurations page
-
Enter your Base websites URL* with the format https://your-store.com
-
Enter your Pixlee API Shopify Token. See Get your API Keys for help accessing your token
-
Click Save
After successfully saving your URL and Shopify Token, you will be able to access your app's Dashboard page. The app will automatically begin exporting your store's product data to Pixlee. Once this process is complete, you will see a green checkmark next to Products in sync in your Dashboard's Setup section. The rest of the checkmarks will appear within 24 hours of fully implementing widgets and analytics in your store. In case they don't or in the future if they become red for any reason, contact support here.

Analytics
Javascript Analytics
In order to add the required analytics javascript to the store frontend, you must Enable App Embed. In the app embed there is a Require Cookie Consent setting which defaults to disabled. When disabled, cookie consent is not checked. All analytics javascript is added to the page and enabled in widgets. When enabled, the cookie consent is checked using Shopify's customer privacy consent-tracking-api. The analytics javascript will only be added if customer gives consent. Also, widget tracking will only be enabled if consent is given.
Custom Consent Implementation
The consent checking javascript provides an override if the site uses a custom consent implementation that does not use Shopify's customer privacy API. A "pixlee:app-consent-loaded" event is dispatched when the API object is ready with the override. Use the window.PixleeAppConsent.setConsentOverride(<bool>) function to set whether consent is provided or not.
Example:
const applyOverride = (api) => {
  const allowed = myConsentSource(); // your consent value: true/false
  api?.setConsentOverride?.(allowed);
};

window.addEventListener('pixlee:app-consent-loaded', (evt) => {
  const api = evt.detail?.api || window.PixleeAppConsent;
  applyOverride(api);
});

// Optional: if the event fired before this script ran
if (window.PixleeAppConsent?.setConsentOverride) {
  applyOverride(window.PixleeAppConsent);
}
Conversion Analytics
The updated Shopify checkout does not allow script tags or app embed added javascript. In order to capture conversion analytics after upgrading the store checkout, follow the steps below to install the new app web pixel.
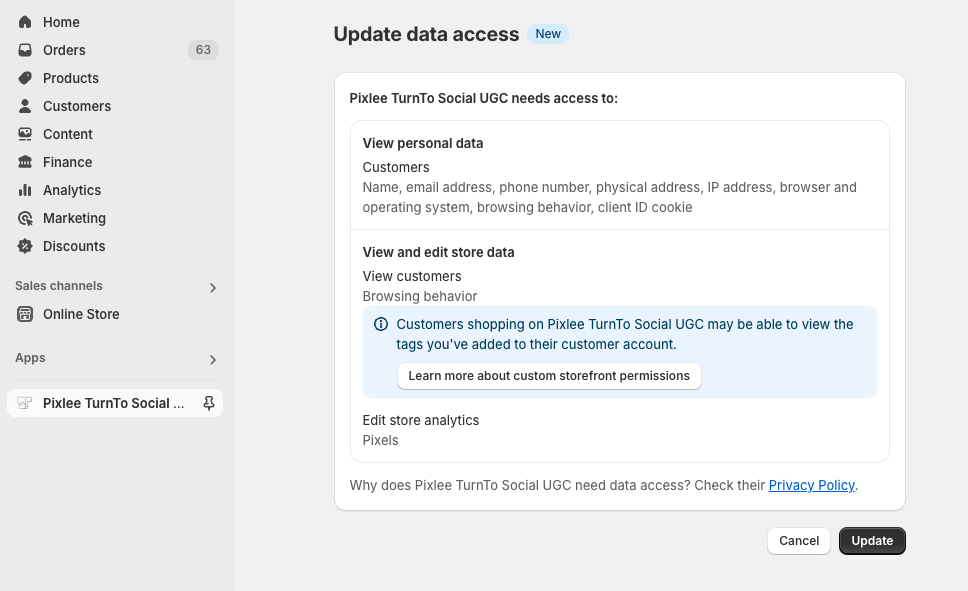
The app uses Shopify's web pixel to capture conversion data on order completion. For new installations of the TurnTo Social UGC app, the web pixel is installed when the app is installed. Additional app permissions in Shopify are required to install the pixel and view customer checkout data.
For stores that already have the app installed, the additional app permissions must be approved to install the web pixel.
Steps:
- Open the Pixlee TurnTo Social UGC app in Shopify. For additional instructions, see Shopify's documentation for how to open apps.
The page redirects to the Update data access screen. - Click Update to approve the new permissions.
- From the navigational sidebar, open the Configuration page for the Pixlee TurnTo Social UGC app.
- Click Save in the General section to install the pixel. This process will also update the pixel configuration if necessary in the future.
To disable conversion analytics, contact your customer success manager or support to add the conversion disable flag to the account. After the flag is added, follow the above steps to update the pixel configuration by clicking Save in the app Configuration page.
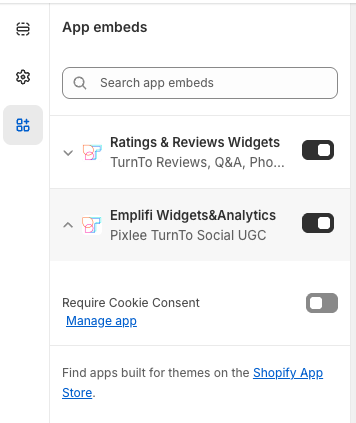
Enable App Embed
In order to add the javascript required for UGC analytics, you must enable the App Embed in your store's theme.
-
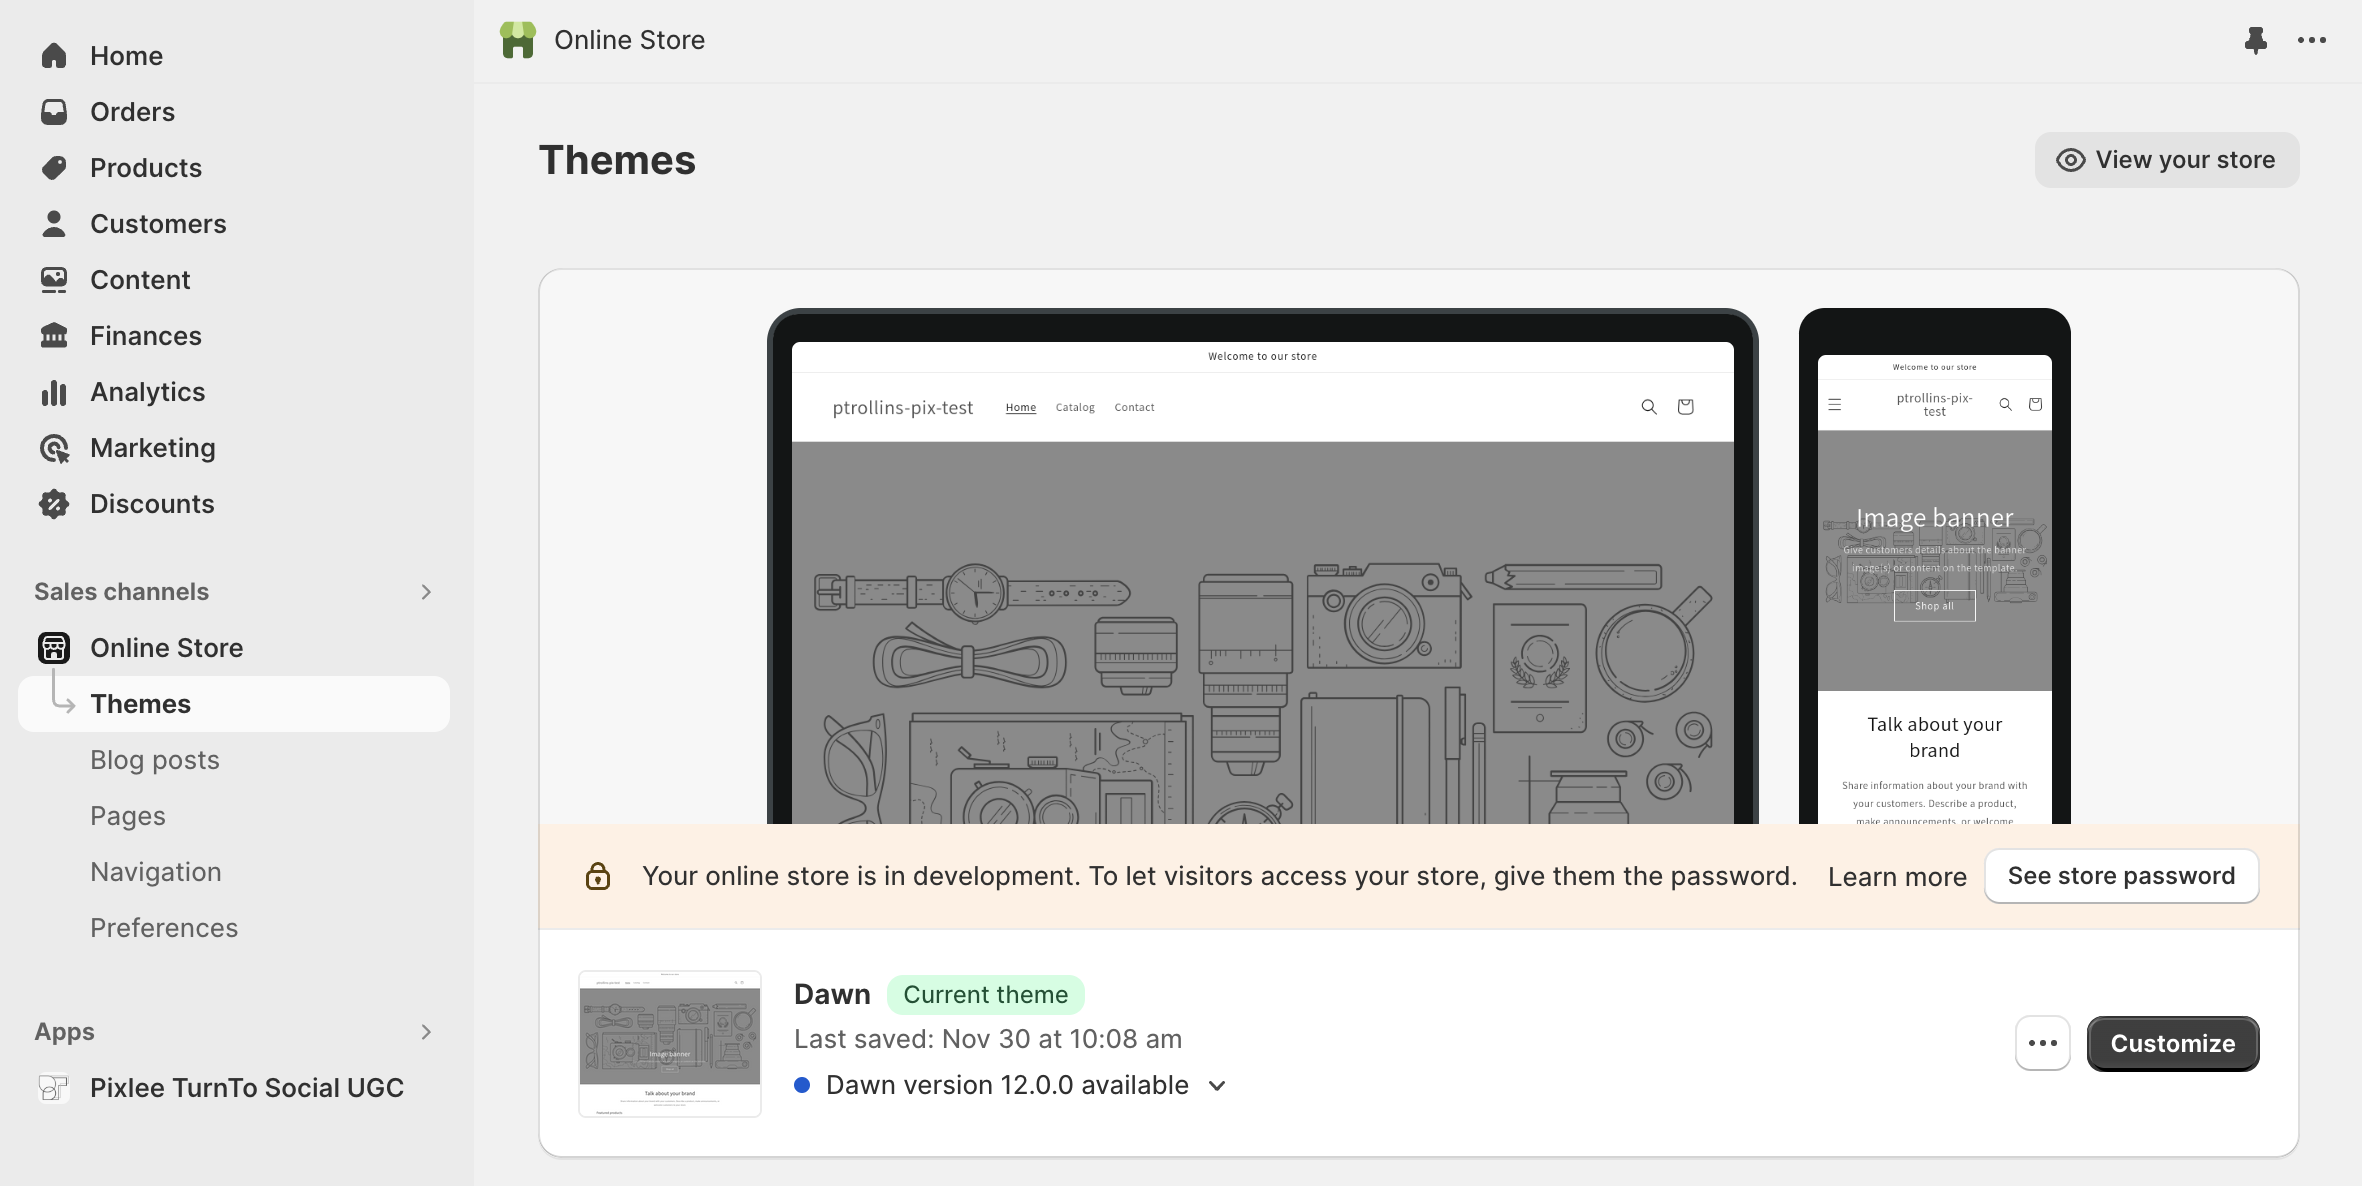
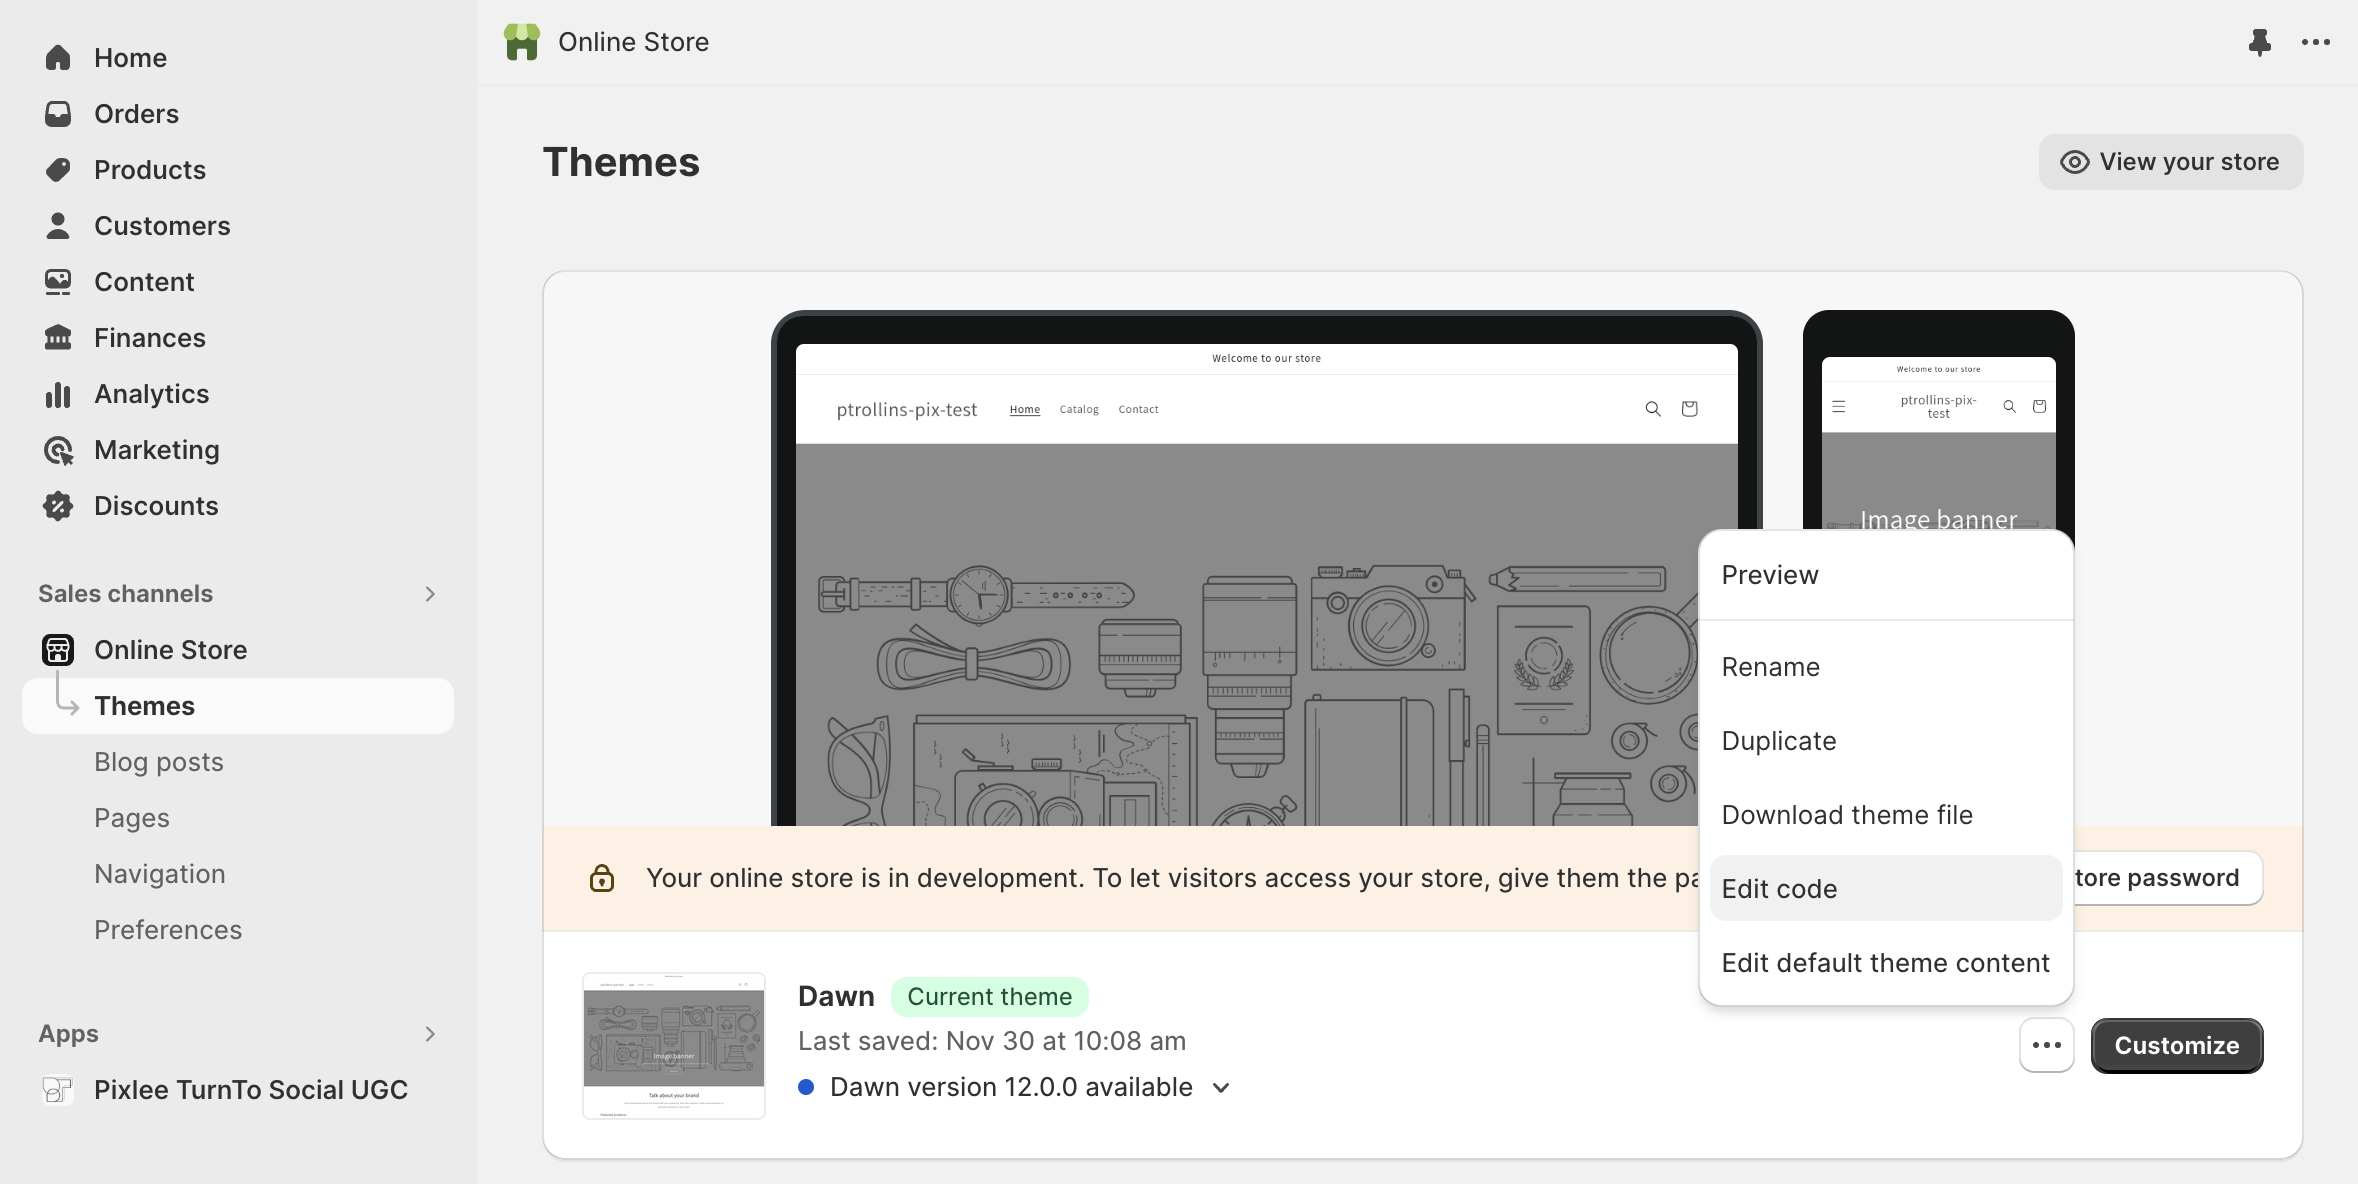
In your Shopify store admin, open Sales channels > Online Store in the left navigation panel and select Themes
-
In the theme editor, click the App Embed button in the far left nav panel
-
Switch on the toggle for Emplifi Analytics/Widget to enable the app embed
-
Optionally, click the embed to see settings and enable Require Cookie Consent to have the app check user consent before collecting analytics.
Setup Widgets in Pixlee
Once all of your products have been exported to Pixlee, you will be able to set up widgets in your Pixlee account to add to your site.
- Log in to http://pixlee.com
- Navigate to the Publish Center in the top navigation bar

- Customize the widget as desired and save the widget.
Note: We recommend that you leave the "Load Priority" setting to "Low priority" when customizing.
Embedding a PDP, CDP, and Simple Widgets on your site
Steps for Shopify's Theme 2.0 themes
-
In your Shopify store admin, open Sales channels > Online Store in the left navigation panel and select Themes
-
On the Themes page, click the Customize button for the theme
-
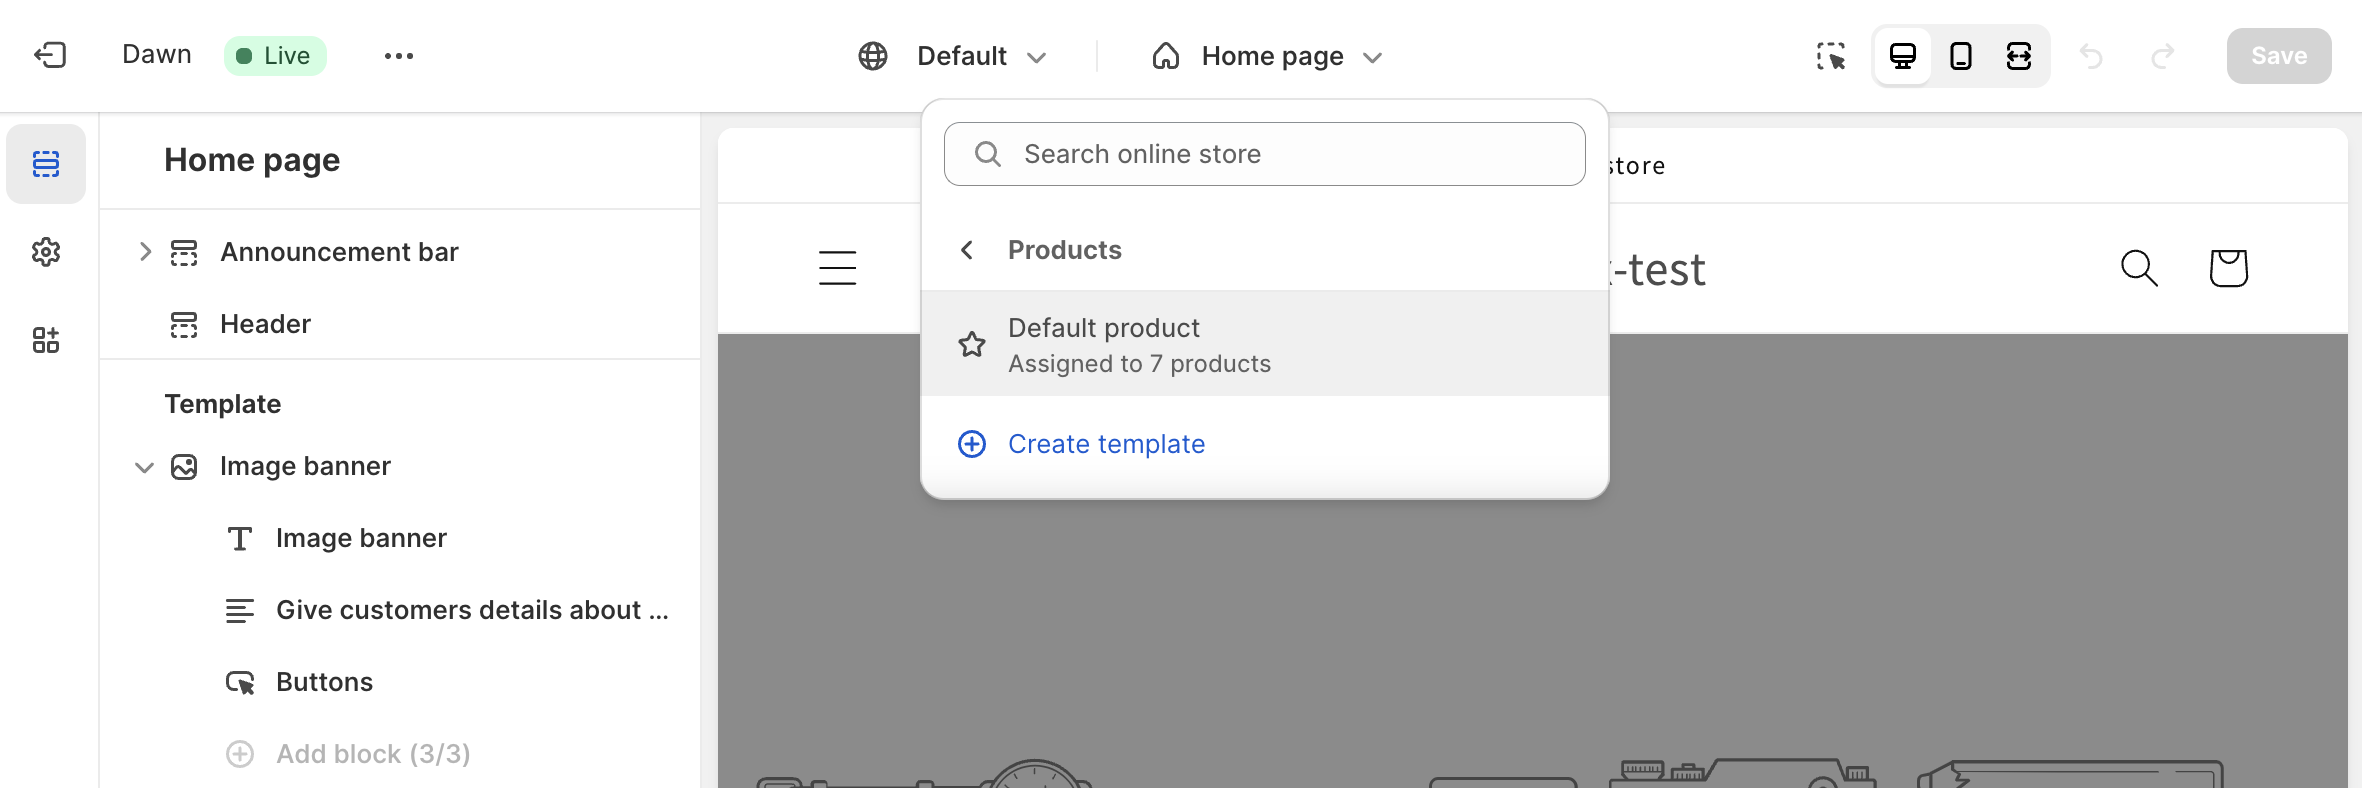
In the theme editor, open the page selector dropdown in the center of the top navigation bar and select the page you want to add the widget to
-
For the PDP widget, select Products > Default Product
-
For the CDP widget, select Collections > Default Collection
-
For Simple widgets, you can select any page
-
-
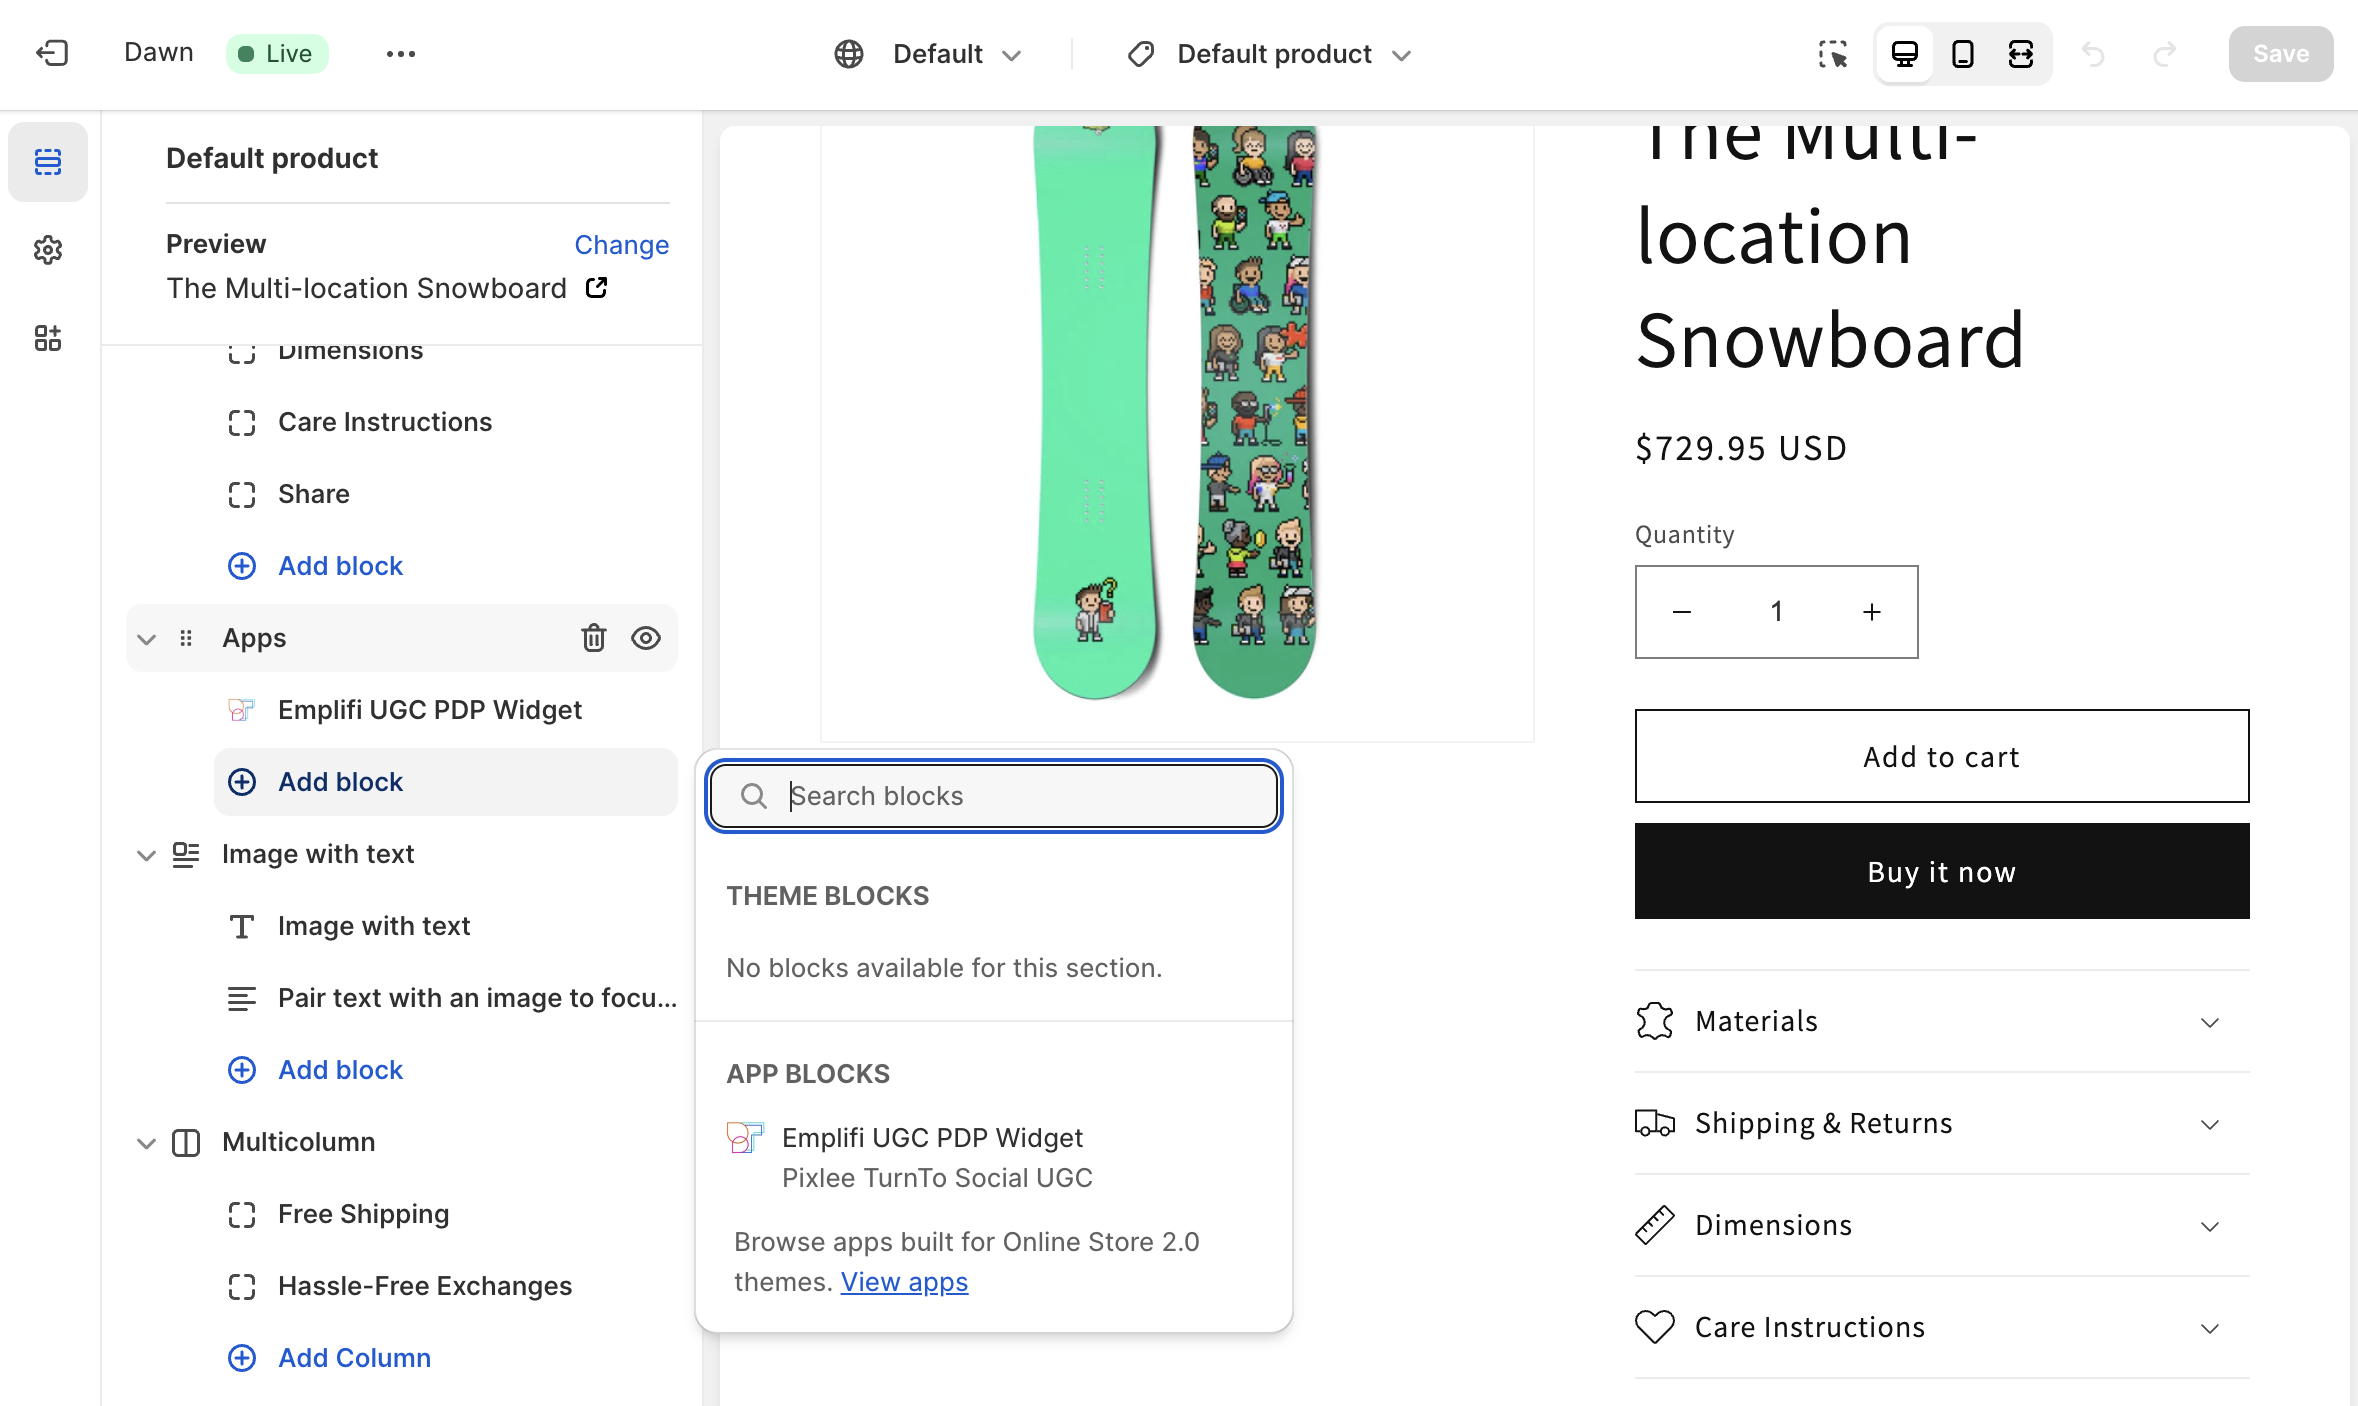
In the Template section of the editor, click Add Block in section you want the widget to or click Add Section to create a new section with the widget block
-
Once the block is added, click the block to open the block settings.
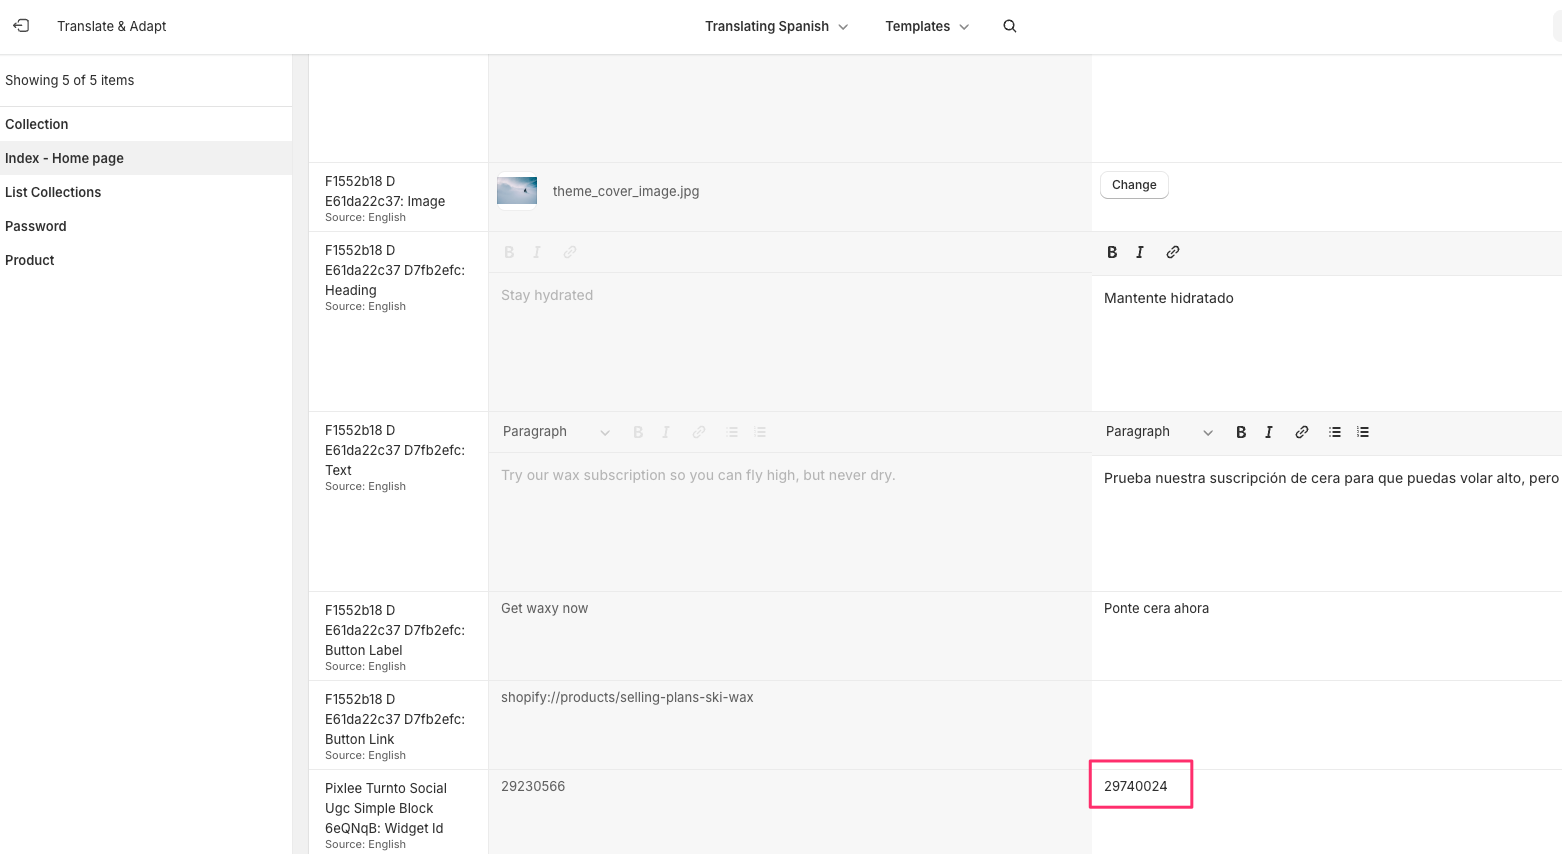
- Widget ID - The Widget ID identifies the widget created in Publish Center that will be displayed on the page. This field accepts either a single Widget ID or a JSON object to allow a different widget to be displayed for each market and language. Please reach out to your implementation team or support for assistance.
-
Widget per market or language - For separate markets or languages within the same store a different widget is required for each one. To display the correct widget, the widget ID must be changed. By using json format will set the correct widget ID based on the country and language selected by the user.
The object should have a key for each country supported and each country should have a key for each language supported for that country with the widget ID for that pair (see examples below). The country must be a two letter ISO country code (ex. US, CA, ES) and the language must be the two letter ISO language code (ex. en, fr, es).
The widget provides the option to set a "default" country and "default" language for each country as the fallback Widget ID if no match is found for the user selected combination. It is recommended to always set "defaults" unless there are specific countries or languages you do not want widgets displayed.
- The recommended format for a single ID to work with any country and language combination ex:
{ "default": { "default": <widget_id> } } - The recommended format (without comments) for multiple widget IDs ex:
{
  "default": {
		"default": <widget_id> // Widget ID used for any country other than CA or ES
  },
	"CA": {
    "default": <widget_id_2>, // Widget ID used if any language other than French is selected on Canada site
		"fr": <widget_id_3> // Widget ID for French on Canada site
  },
	"ES": {
		"es": <widget_id_4> // Widget will not display on Spain site if Spanish is not selected because no default is set
  },
}
- The recommended format for a single ID to work with any country and language combination ex:
-
Single Widget - If the store only has a single market and language or if you want the same widget across the site, a single Widget ID can be used. Optionally, it is possible to change the single ID using the steps below. These options have limitations so the json method above is recommended.
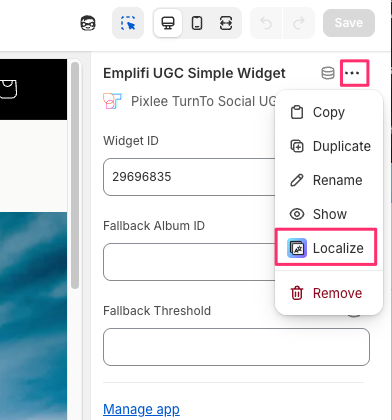
- Change widget per language - If your store offers multiple languages, you can use Localize in the widget to set a different Widget ID for each language translation.
-
While you have the widget block settings open, click the three dots in the upper right corner to open the menu
-
Select "Localize" from the menu to open the template translations
-
Find the widget block's Widget ID in the list, and enter the Widget ID for the appropriate language in the right hand column next to the default Widget ID
-
Change widget per market - If your store has multiple markets and you want to have a different widget displayed for each market, you can set a different Widget ID for each market in the theme editor. the Widget ID for the default market will be used for all markets until the value is overridden by selecting the market in the editor and setting the ID for that market.
- On the page where the widget is added, select the appropriate market from the site's frontend market selector
- In the selected market, you should be able to add the Widget ID for that market
- Repeat the steps for each market
- NOTE: Shopify has limitations on block settings that may prevent the settings from showing if the default language is not available for that market. Ex. If the default language is English but the market does not have English as an option.
-
- Change widget per language - If your store offers multiple languages, you can use Localize in the widget to set a different Widget ID for each language translation.
-
- Fallback Album ID (optional for Simple Widgets) - Album ID to use if fallback threshold is not met
- Fallback Threshold (optional for Simple Widgets) - Number of media items in album to use fallback album
- Widget ID - The Widget ID identifies the widget created in Publish Center that will be displayed on the page. This field accepts either a single Widget ID or a JSON object to allow a different widget to be displayed for each market and language. Please reach out to your implementation team or support for assistance.
Steps for vintage themes
After you Setup Widgets in Pixlee, press the "Generate Embed Code" button and you will be presented with an embed code. This script needs to be customized to work on Shopify product pages.

PDP Widget for Product Page
Copy the embed code from above and replace the skuId:"<= ENTER YOUR SKU ID CODE >" property with ecomm_platform:"shopify" in the Pixlee.addProductWidget() function. The resulting code should look like
<div id="pixlee_container"></div>
<script type="text/javascript">
  window.PixleeAsyncInit = function() {
  	Pixlee.init({apiKey:"<ACCOUNT API KEY>"});
    Pixlee.addProductWidget({
      accountId:<ACCOUNT ID>,
      widgetId:<WIDGET_ID>,
      ecomm_platform:"shopify"
    });
	}
</script>
<script src="https://assets.pxlecdn.com/assets/pixlee_widget_1_0_0.js"></script>
CDP Widget for Collection Page
Copy the embed code from above. Replace addProductWidget with addCategoryWidget, remove the skuId and accountId and replace them with nativeCategoryId:{{ collection.id }}, and ecomm_platform:"shopify". The resulting code should look like
 <div id="pixlee_container"></div>
<script type="text/javascript">
	window.PixleeAsyncInit = function() {
		Pixlee.init({apiKey:"<ACCOUNT API KEY>"});
		Pixlee.addCategoryWidget({
      widgetId:<WIDGET_ID>,
      nativeCategoryId:{{ collection.id }},
    	ecomm_platform:"shopify"
    });
	};
</script>
<script src="https://assets.pxlecdn.com/assets/pixlee_widget_1_0_0.js"></script>
For Both Widgets
-
Log in to your Shopify store
-
Open Online Store on the left navigation panel and click Themes
-
In Themes, click the ... button next to Customize and select Edit Code from the dropdown.
-
In the editor, scroll down to the appropriate liquid file for where you want to add the widget. Paste the appropriate code snippet created above into the page where you want the widget to show.
-
For PDP Widget, edit
product.liquid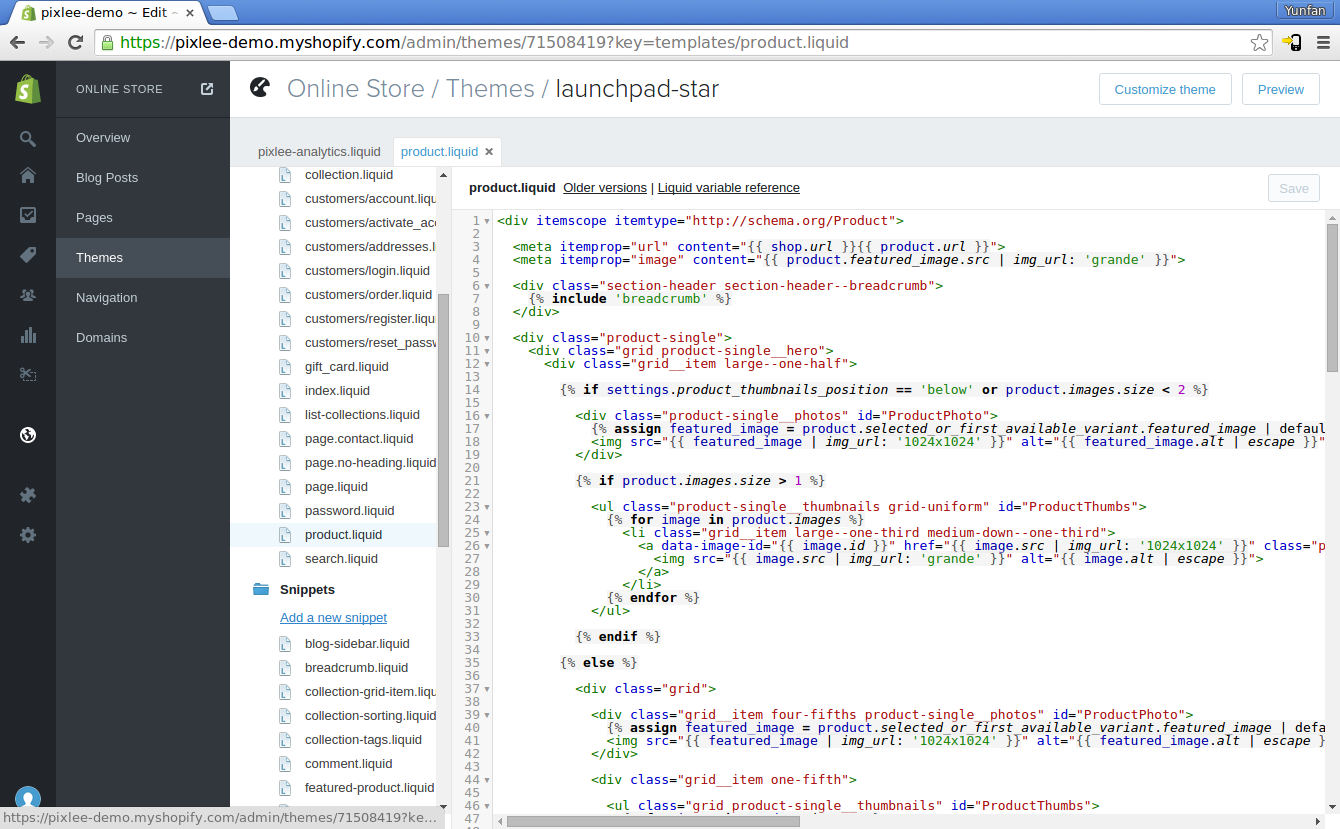
-
For CPD Widget, edit
collection.liquid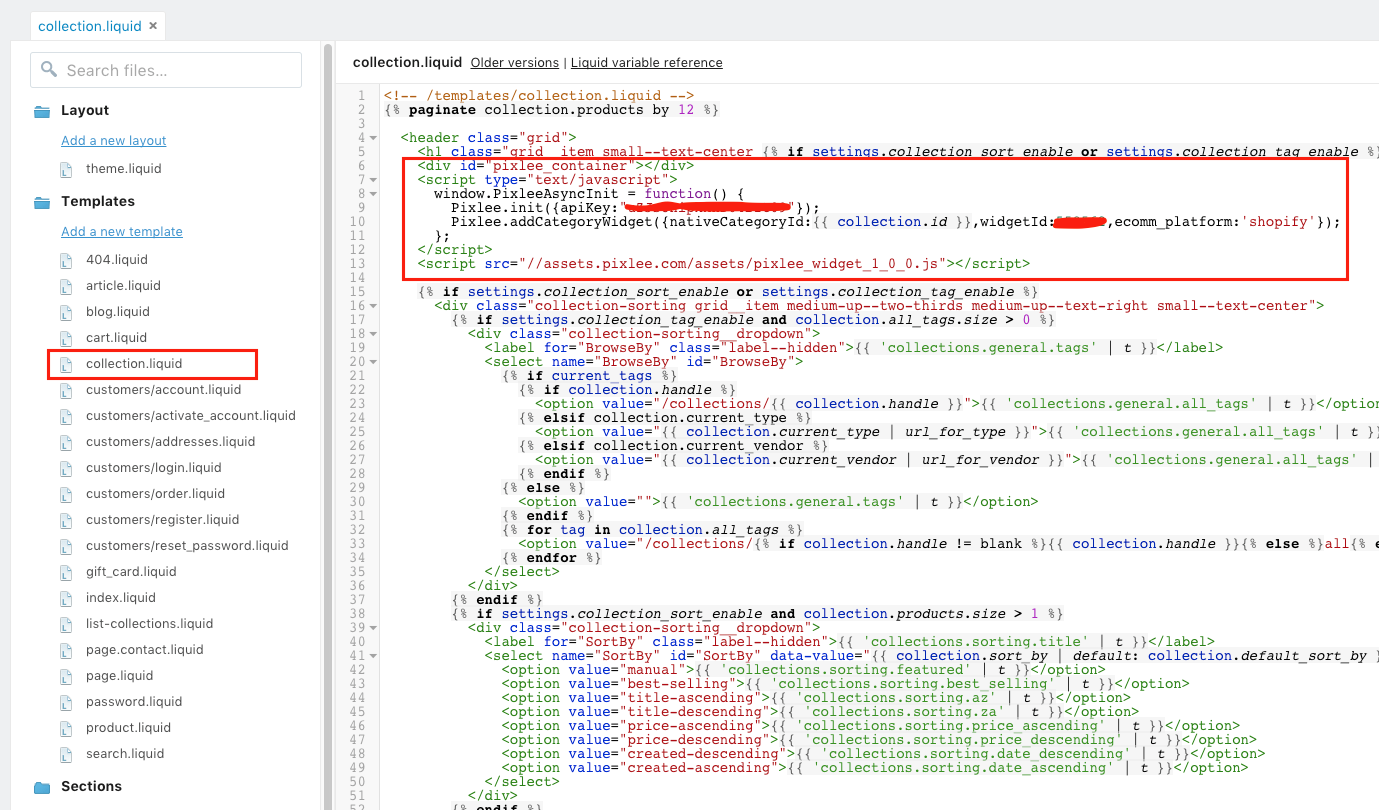
-

Updated about 1 month ago