
Salesforce Commerce Cloud - SFRA & SiteGenesis
Documentation for setting up your SFCC SFRA or SiteGenesis store to work with Pixlee
[Formerly Demandware]
Installing the Pixlee Salesforce Commerce Cloud Cartridge
This article explains how to install Pixlee extension module (cartridge) on web stores built on top of Salesforce Commerce Cloud (SFCC) B2C platform.
SFCC presently provides two reference applications to be used as starting points for building client stores:
- Storefront Reference Architecture (SFRA)
- Site Genesis
Pixlee SFCC cartridge supports both these applications, details on how it can be installed for both are provided below.
Before you begin
Pixlee account setup
To take advantage of services provided by Pixlee, you first need to sign up for Pixlee account. You can start with requesting a demo or contacting Pixlee directly.
Getting your Pixlee Account ID and API keys
Once you have an account, you will be able to look up your Account ID and API keys (Account API Key, Account Private API Key, and Account Secret Key) required for connecting your store to Pixlee services.
Please refer to Getting your API Keys for more details as to how to obtain those keys.
Configuring your widgets
The cartridge allows Pixlee widgets (a.k.a. displays) to appear on storefront pages like product details and category landing. Those widgets allow moderated content collected from social media or manually uploaded, related to your products or navigation categories, to be presented to your web site visitors. The visitors can also share or upload their own content straight from the site.
Pixlee widgets can be created and configured in Pixlee Admin, the configuration allowing to control their appearance and behavior.
As per your needs, configure two such widgets – one for product detail page and another one for category landing page (the widgets will automatically pick the relevant content to show for each product or category).
To configure your widgets:
-
Go to https://www.pixlee.com, log in, and navigate to the Publish tab. Alternatively, point your browser to https://app.pixlee.com/app#publish while logged in.
-
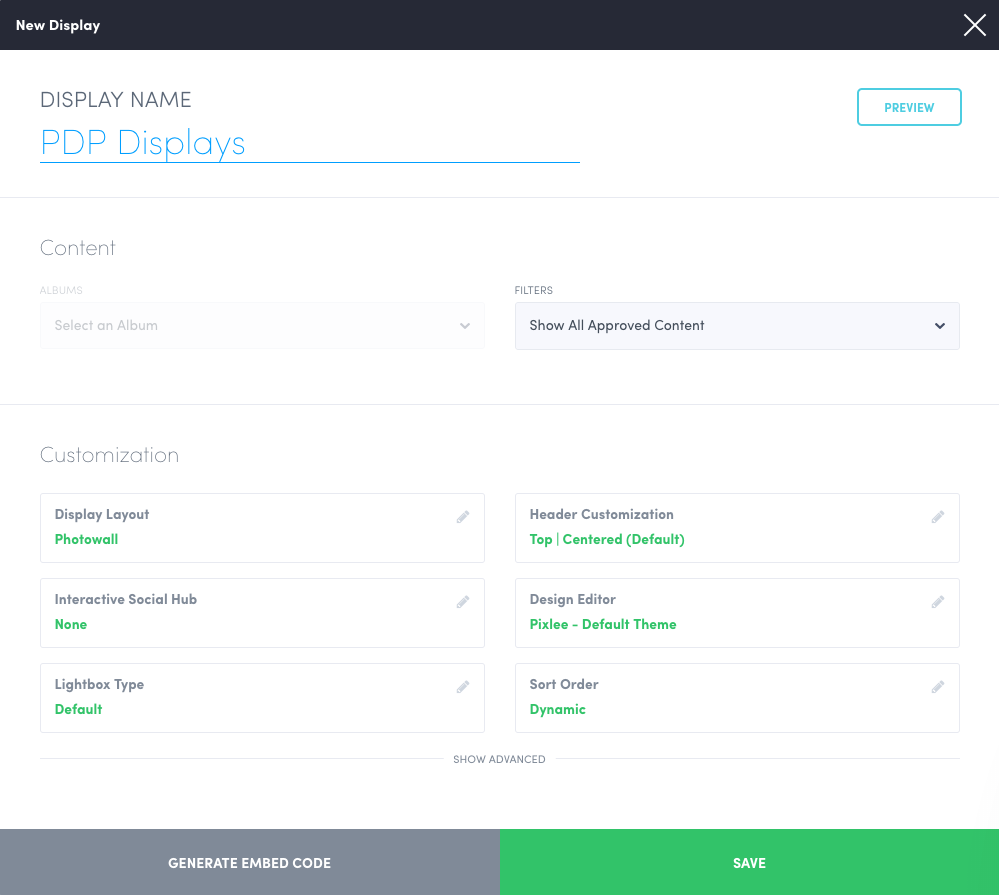
Click the Install Product Displays and it should present you with a lightbox that looks like following.
-
Customize the widget as you wish and click Save.
-
Take note of the widget ID. This number we be need in one of the later steps.

Repeat the steps 1-4 and generate your second widget for category landing pages.
Deploy Pixlee cartridge to your SFCC environment
Getting the cartridge
Download the latest release source code from the Pixlee salesforce-commerce-cloud Github repository
The repository (or zip file) has three top-level folders:
- cartridges
- documentation
- metadata
Updating the metadata
The first thing we need to do when deploying the cartridge is to update the metadata of your SFCC environment. This metadata update includes:
- Extensions to SFCC systems objects (site and organization preferences)
- Service definition
- Two sample jobs
The easiest way to update the metadata of your environment with the above is to do a site import. For that purpose:
- Open the metadata folder and create a zip of its pixlee_site_template subfolder:
Please make sure the zip file has the same name as that folder:

- In your SFCC Business Manager, navigate to Administration > Site Development > Site Import & Export:
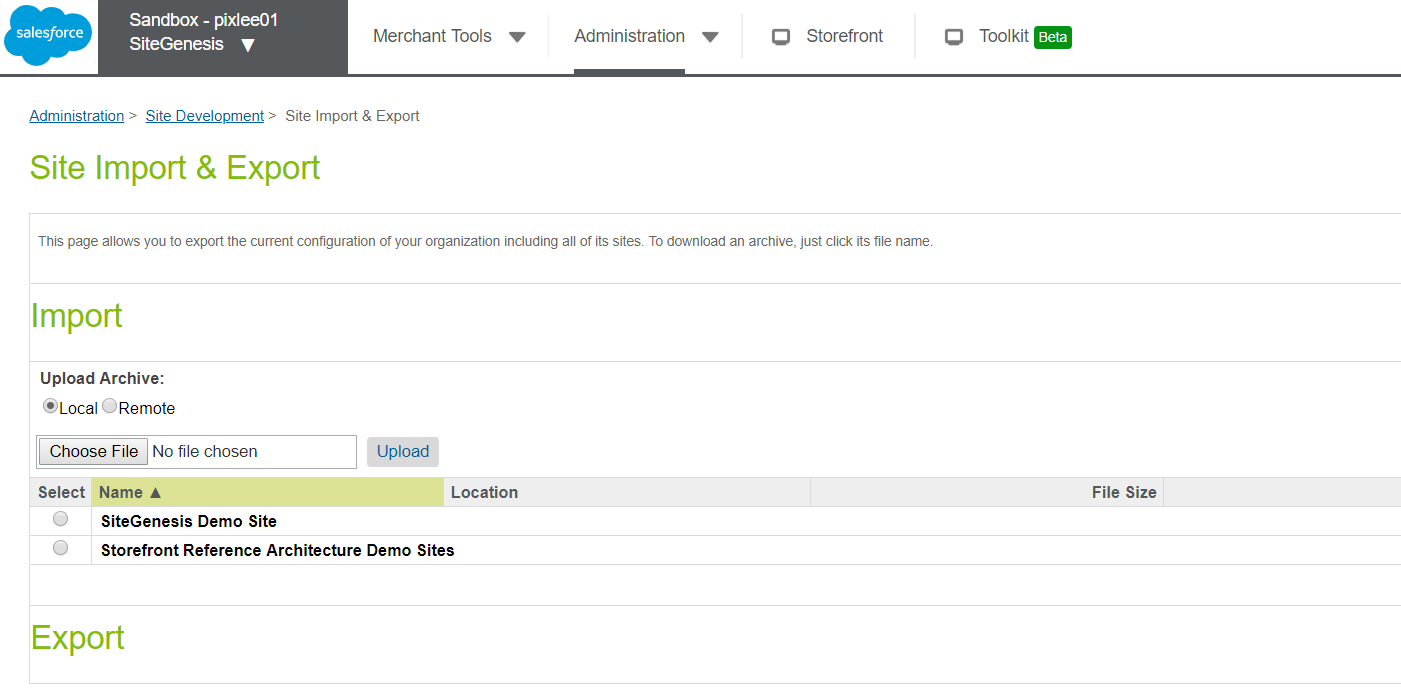
- Click Choose File, select the zip you created in the previous step, and then click Upload. Once upload completes, you should be able to see the zip file in the list of availabel imports:
NOTE:The label of Choose File button can be different depending on your browser
-
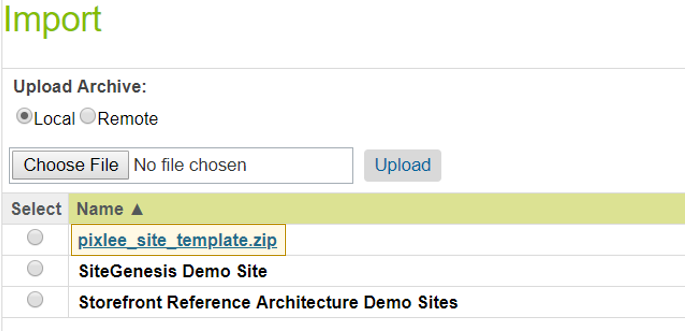
Select the zip file from the list of available site imports and click Import, and then click OK to confirm.
-
Wait for the import job to finish, it should take less than a minute.
In case the import was successful, you should be able to see the following:
- Pixlee site preferences in Merchant Tools > Site Preferences > Custom Preferences.
- Pixlee Organization preferences in Administration > Global Preferences > Global Custom Preferences.
- Pixlee service definition (pixlee.http.service) in Administration > Operations > Services.
- Two sample jobs (Pixlee Product Export – SFRA and Pixlee Product Export – SiteGenesis) in Administration > Operations > Jobs.
Building and deploying the code
To make your store application take advantage of Pixlee services, we need to make sure that the cartridge code is built and deployed (uploaded) to your SFCC environment. This process is different depending on the reference application your store is built upon, so a separate set of instructions will be given for SFRA and Site Genesis.
SFRA
The SFRA version of Pixlee cartridge is designed around the same build and deployment concepts as the SFRA core cartridges and plugins provided by Salesforce.
-
In the root folder of your cloned repository, run
npm installto install all of the local dependencies (node version 8.x or current LTS release recommended) -
If necessary, update the path to your base SFRA installation in
package.jsonfile from the same root folder.
Normally you would have a top-level project folder, into which the repositories of SFRA base cartridge and all required plugins, libraries and any other LINK cartridges will be cloned. In case you have cloned the Pixlee cartridge into that folder as well, the below change will not be required. Otherwise, update paths.base property in the package.json to contain a relative path to the local directory containing the Storefront Reference Architecture repository. Its default value will be as follows:
"paths": {
    "base": "../storefront-reference-architecture/cartridges/app_storefront_base/"
}-
Once you are certain the correct path to SFRA cartidges is configured, run
npm run compile:jscommand from the root folder of Pixlee repository. -
Finally, having downloaded all local resources and having compiled the script files, we can upload the code to our SFCC environment (sandbox). That can be done from the command line as well, for which purpose a file called
dw.jsonneeds to be created in the root folder of Pixlee repository. It should have the folliwing content:
{
    "hostname": "{{your-sandbox-hostname}}.demandware.net",
    "username": "{{your_login}}",
    "password": "{{your_pwd}}",
    "code-version": "{{version_to_upload_to}}"
}
Once you have the file in place, run npm run uploadCartridge command. Make sure it uploads the two cartidges (int_pixlee_sfra and int_pixlee_core) required for SFRA based applications (even though uploadCartridge command sounds like a single cartridge will be uploaded, it should acutally upload those two and report so).
Site Genesis
For Site Genesis based application we will need to upload int_pixlee and int_pixlee_core cartridges as they are, no preliminary building or installing local resources will be required.
Please contact Pixlee support in case you want to use a different upload mechanism or in case you want to get the code uploaded for you.
Configuring your Site
Once the cartridge and metadata are deployed to your SFCC environment, the integration must be enabled and then configured for each particular site.
The Pixlee services are enabled for a particular site with the help of a Site custom preference. The configuration like API keys is stored as custom organization-level preferences.
Add Pixlee cartridge to Cartridge Path
You will need to ensure the Pixlee cartridge is present in the cartridge path of each site for which it is enabled. For SFRA-based apps, the Pixlee cartridge must be positioned to the left of the base SFRA cartridge (or SFRA custom cartridge if used), e.g. (Sites > Manage Sites > Site > Settings > [Your Site] Cartridges):
int_pixlee_sfra:int_pixlee_core:app_storefront_base
For Site Genesis based applications, the cartridge path will vary greatly depending on other cartridges utilized (LINK, etc). Generally, it is safe to position the Pixlee cartridge last on the path, however, that would require some changes to templates, controllers and/or pipelines in your client code in order to allow the integration to function correctly. See Site Genesis section for details on those changes.
Configure Organization preferences
NOTEOrganization preferences are cross-site settings, and although every site would have its own set of site preferences (see below), there will be only one set of organization preferences, to be used by all your sites.
The Pixlee organization preferences include all common configuration like credentials, API keys and endpoints.
To set the organization preferences:
-
In Business Manager, go to Administration > Global Preferences > Global Custom Preferences.
-
Select Pixlee Preferences from the Group dropdown.

-
Set the Account ID, API Key, Secret Key, and Pixlee API Base URL with your Pixlee API credentials.
-
Check the Conversion Enabled checkbox to enable tracking of conversion analytics events.
-
Set the Add to Cart Event Name to add:to:cart and Product Conversion Event Name to checkoutcomplete.
-
Click Save button to store the configuration values entered.
Configure Site preferences
The site preferences you will be setting are specific to your particular site, thus providing an opportunity to enable the Pixlee integration for the sites where its needed, and keeping it disabled on the other sites of your SFCC instance (this would be particularly important on development and staging instances or in cases you may have multiple stores hosted within the same SFCC instance).
To enable Pixlee services for a site:
-
In Business Manager, go to Merchant Tools > Site Preferences > Custom Preferences.
-
Select Pixlee Preferences from the Group dropdown.
-
Check Enable Pixlee Services to enable Pixlee integration with the site.

-
Set the Product Widget ID to the widget ID of the Pixlee widget configured for product details page. For information on where to get this ID, see Configuring your widgets.
-
Set the Category Widget ID to the widget ID of the Pixlee widget configured for category landing page. For information on where to get this ID, see Configuring your widgets.
-
Ensure the Add to Cart Analytics and Conversion Analytics check boxes are set to enable analytics.
-
Click Save button to store the configuration values entered.
Export product catalog
Having the Pixlee products catalog in sync with the product data in SFCC is important for ensuring the correct content is presented to the customer through Pixlee widgets. The cartridge comes with two sample jobs that can be scheduled to run periodically to ensure the catalog remains up-to-date.
Setting up Pixlee Product Export job
The sample jobs are:
- Pixlee Product Export - SFRA
- Pixlee Product Export - SiteGenesis
Each one of them is suitable for the matching type of application - the difference between the two being the way availability is determined for a product - SFRA is using its inventory helper, while Site Genesis is relying on availability model.
To schedule one of those jobs to run periodically and keep the product catalog in Pixlee in sync with that of Salesforce Commerce Cloud:
-
In Business Manager, go to Administration > Operations > Jobs.
-
Click the job to configure depending on the application type used in your store (SFRA or Site Genesis).
-
In the Job Steps tab configure the sample job step (ExportPixleeProducts) for each of the sites for which the Pixlee integration is enabled:
a. Set SiteID to the site's ID.
b. Set CatalogID to the id of master catalog to be exported (typically sitecatalog).

-
In the Schedule and History tab click Create Schedule to create a new schedule for running the job.
-
Select Every 1 Days under Daily Schedule section, check Repeat checkbox and repeat every 60 Minutes.

-
Click Create to complete schedule creation.
-
Click the green Run button to trigger immediate execution of the product export job with the schedules created.
-
Repeat steps 1 - 7 should you have multiple sites/catalogs to be integrated with Pixlee. You can configure a single job to work for all sites, or you can create a new one for each of the sites, repeating the steps above and starting by cloning the respective sample job.
Analytics Setup
The cartridge integration allows tracking a range of analytics events, such as add to cart and conversions (completed orders). The most common ones supported by Pixlee tracking code are enabled out of the box with no changes required to the client code. However, due to the nature of the customizations typically applied to reference applications, the integration may require some customization – more details on this subject for SFRA and Site Genesis based apps provided in the corresponding sections below.
SFRA
The SFRA version of Pixlee cartridge is designed around the same plugin concepts as the SFRA core cartridges and plugins provided by Salesforce. In SFRA model, Pixlee integration should work out of the box with no client code customizations required. Due to the great customization capabilities of SFRA, however, in rare cases modifications to client code may still be required. When such case occurs, the Site Genesis section should provide some hints on how to trace some of the analytics flow and modify the client code accordingly.
Site Genesis
As mentioned earlier, with Site Genesis based applications your client cartridges will very likely appear to the left of Pixlee cartridge in the cartridge path. Because of that changes will have to be made to some of the components in your client code. These will include changes to isml templates, and some changes to models or pipelines depending on whether you are using JavaScript controllers or pipelines.
Changes to templates
- Add the folowing lines to the very end of your
checkout/cart/minicart.ismltemplate:
<iscomment>Pixlee changes BEGIN</iscomment>
<isinclude template="pixlee/events/addtocart">
<iscomment>Pixlee changes END</iscomment>
- Add the following lines to the end of your
checkout/confirmation/confirmation.ismltemplate, just above</isdecorate>:
<iscomment>Pixlee changes BEGIN</iscomment>
<isinclude template="pixlee/events/confirmation"/>
<iscomment>Pixlee changes END</iscomment>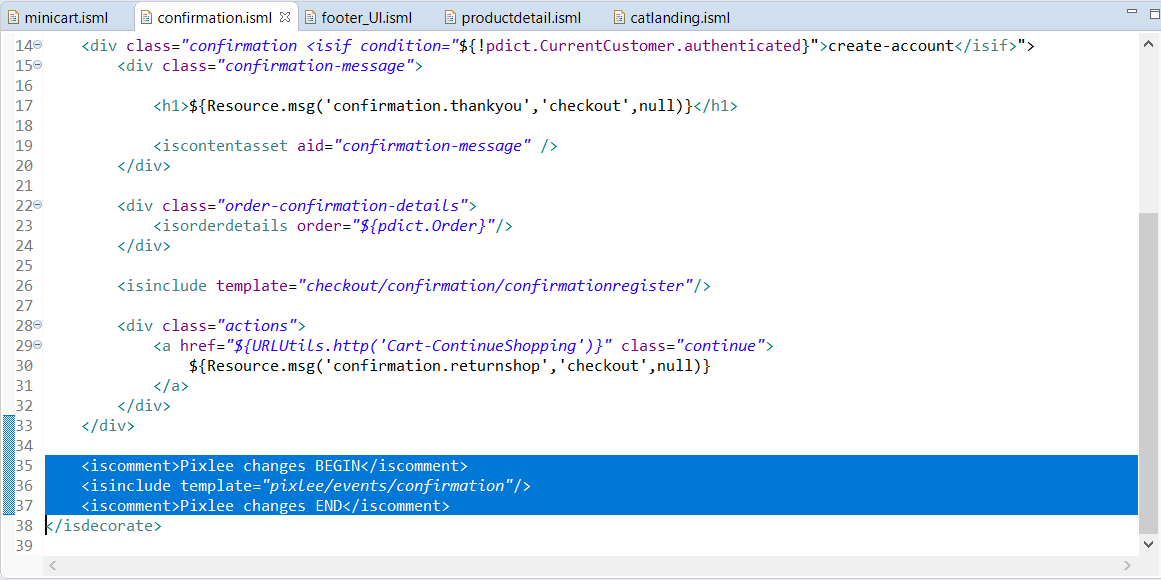
- Add the folowing lines to the very end of your
components/footer/footer_UI.ismltemplate
<iscomment>Pixlee changes BEGIN</iscomment>
<isinclude url="${URLUtils.url('PixleeEvents-Init')}">
<iscomment>Pixlee changes END</iscomment>
- Add the following lines to the end of your
product/productdetail.ismltemplate, just above the closing div tag for pdpMain container:
<iscomment>Pixlee changes BEGIN</iscomment>
<isinclude template="pixlee/widgets/pdp">
<iscomment>Pixlee changes END</iscomment>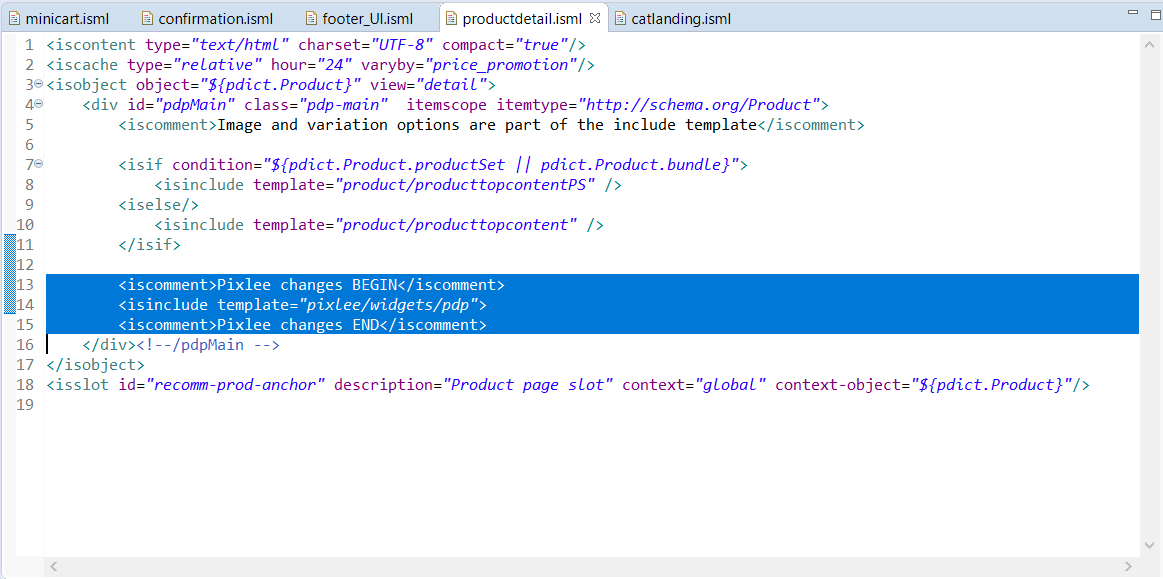
- Add the following lines to the end of your
rendering/category/catlanding.ismltemplate
<iscomment>Pixlee changes BEGIN</iscomment>
<isinclude template="pixlee/widgets/clp">
<iscomment>Pixlee changes END</iscomment>
Changes to JavaScript controllers based Site Genesis applications
NOTEThis change is required to allow add to cart events to be triggered from wishlist page. In case wishlists are not in use on your store, there will be no need to apply it.
In you scripts/models/CartModel.js, add the following lines to addProductToCart function, in the condition handling the case for product addition from list (around line #100):
// Pixlee changes BEGIN
var eventsHelper = require('int_pixlee/cartridge/scripts/pixlee/helpers/eventsHelper');
eventsHelper.processAddProductListItem(productList.getItem(params.itemid.stringValue), params.Quantity.stringValue);
// Pixlee changes END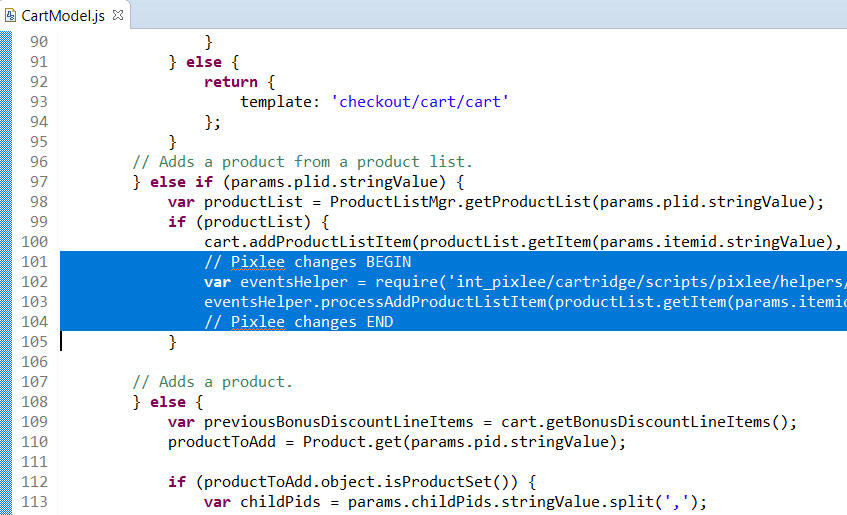
Changes to pipelines based Site Genesis applications
NOTEThis change is required to allow add to cart events to be triggered from wishlist page. In case wishlists are not in use on your store, there will be no need to apply it.
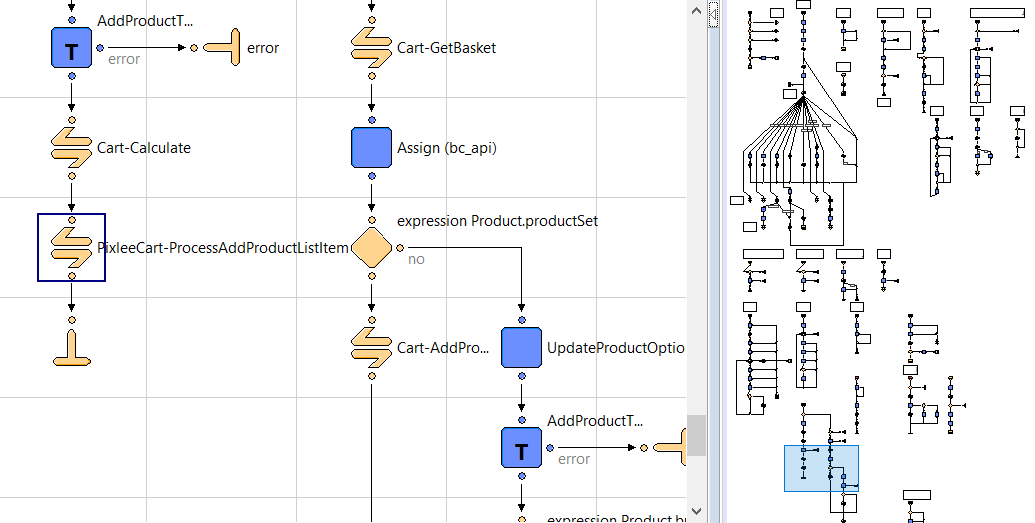
In your Cart pipeline update Cart-AddItem subpipeline, the branch that takes care of adding products to cart from a product list, to include a call to PixleeCart-ProcessAddProductListItem just before it ends:
Testing and Troubleshooting common issues
To test that everything was implemented correctly, we need to check two things -
- Were all the products exported?
- Are API calls being successfully made to the Pixlee API?
Were all the products exported?
Before testing, please make sure that the Pixlee Product Exports job has at least ran once. If you've already run the exports once, skip to step 3.
-
In order to run it manually. Open Business Manager. Under Administration tab click Job Schedules link under the Operations section.
-
Check the checkbox next to Pixlee Product Exports and click Run.
-
Login to Pixlee and navigate to Products under the Album tab. Alternatively, click this link..
-
You should see a list of products on this page.
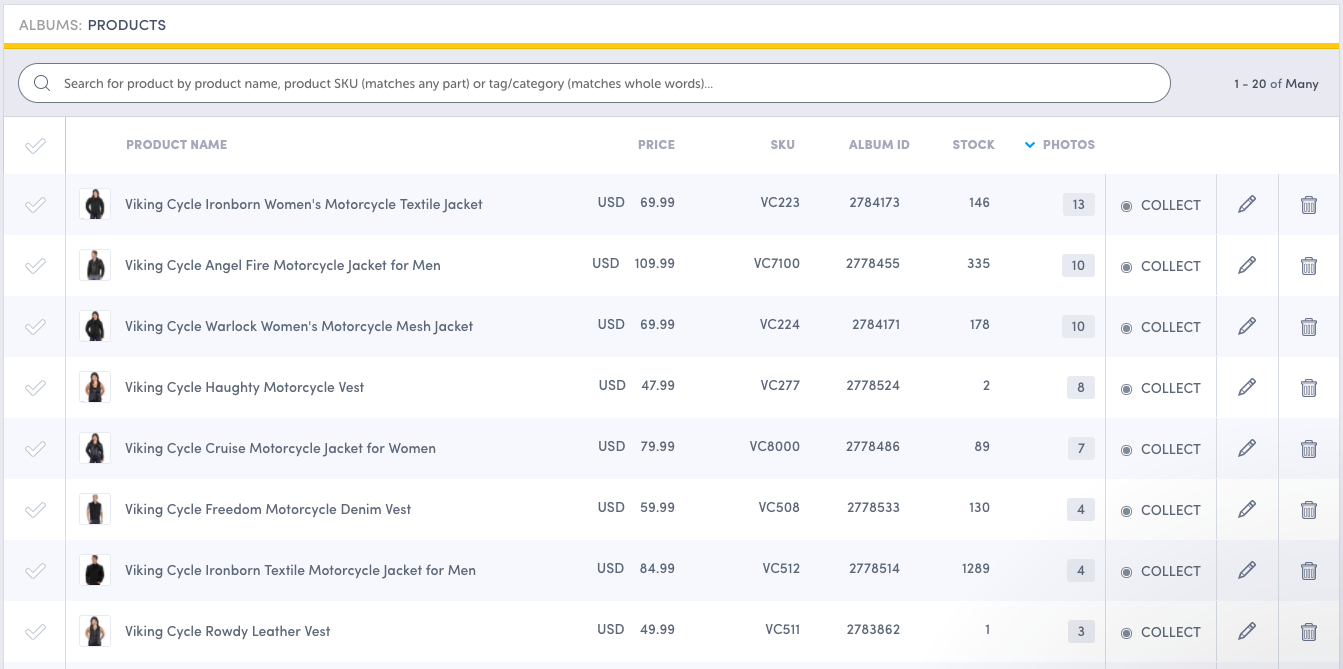
-
Try searching for a few products on this page that you know exist in your catalog.
-
In case the list is empty or you were not able to search for a particular product, proceed to the next step. Otherwise, proceed straight to the next section i.e. Are API calls being successfully made to the Pixlee API?
-
There can be several causes of failure to export products so first, we need to find out the exact cause of the failure. The Pixlee Product Exports job logs all exceptions and errors to the server logs. So the next step for us is to get the logs.
-
Open Business Manager. Under Administration tab click Job Schedules link under the Operations section. Click the Pixlee Product Exports link.
-
Click Schedule and History tab and History you'll find a summary of all the processes that ran recently.

- Click the link to download the log file. Contact us here and attach the log file with the request.
Are API calls being successfully made to the Pixlee API?
API calls are made to Pixlee API when a customer adds something to their cart and when they buy something on your store. We need to make sure that these calls are being made at the right time.
We recommend using Google Chrome for the next steps. But feel to apply the same steps to any other browser of your choice.
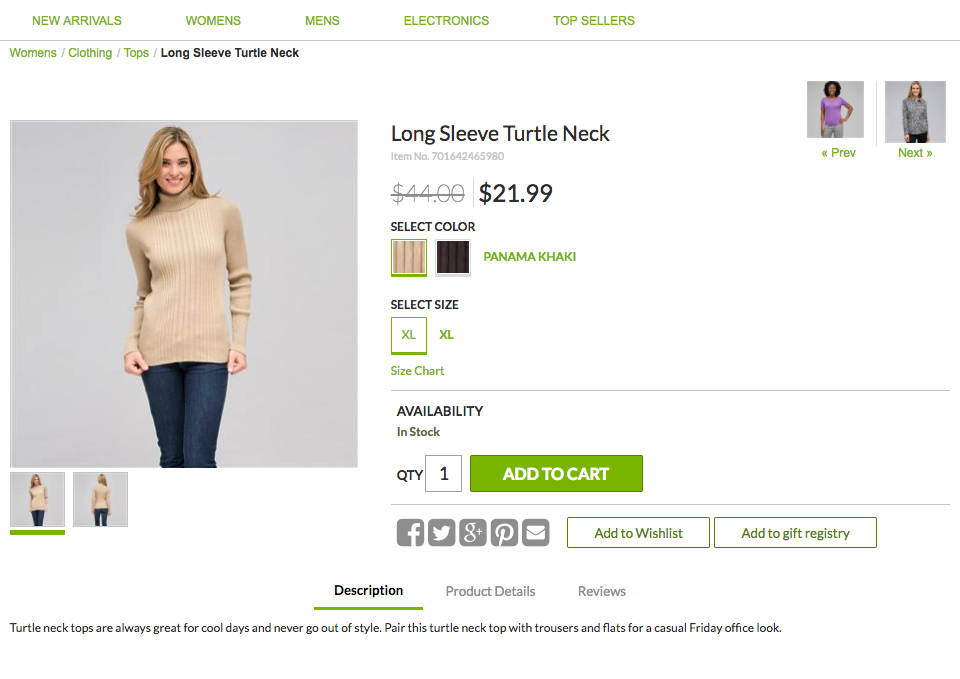
- Open a product page of your store.
- Open Chrome Developer Tools - Right click on the page anywhere and click Inspect. Alternatively, use keyboard shortcut CMD + OPTION + I ( CTRL + SHIFT + I for Windows). On the resulting menu, click the Network tab.
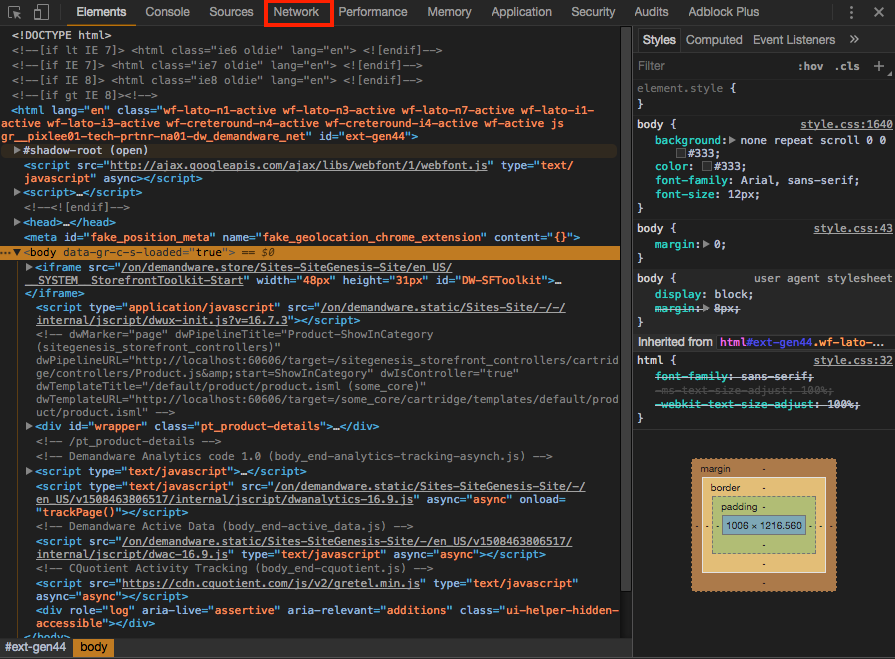
- Ensure that Preserve log checkbox is checked before proceeding.

-
While keeping the Chrome Developers Tools open, switch to the product page and click Add to Cart on the product page.
-
After the product has been added to cart, switch to Chrome Developers Tools again.
-
In the Filter bar type pixlee and that should reduce the number of results. And then look for two calls named addToCart in the results.
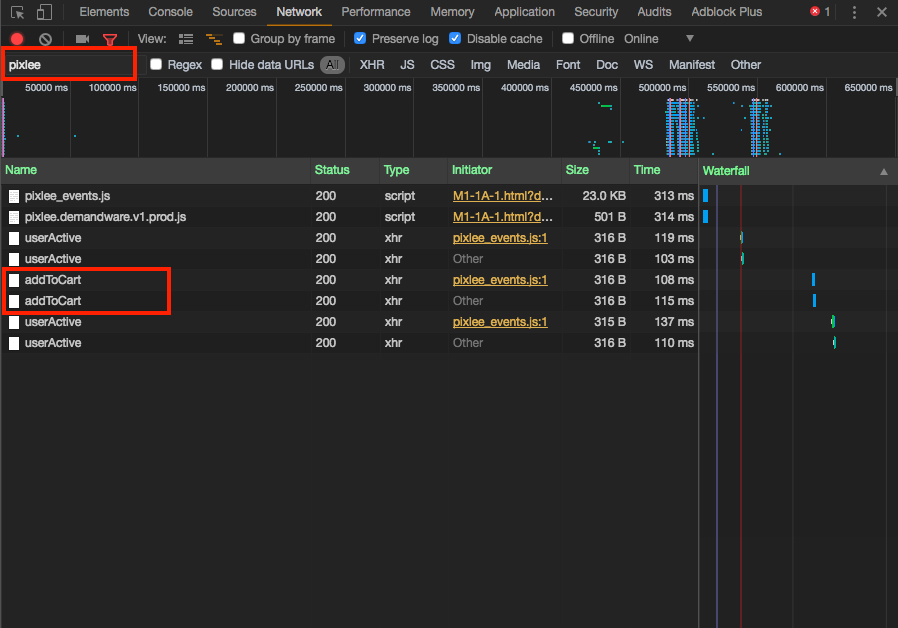
-
If you found the addToCart calls then your analytics were integrated correctly. If not, please revisit Analytics Setup or contact us here.
-
While keeping the Chrome Developers tools open, proceed to checkout and buy the product that you added to cart previously. Use a test payment method for the checkout.
-
When you reach the order confirmation page switch back to Chrome Developers Tools. This time look for Conversion calls in the result instead of addToCart.
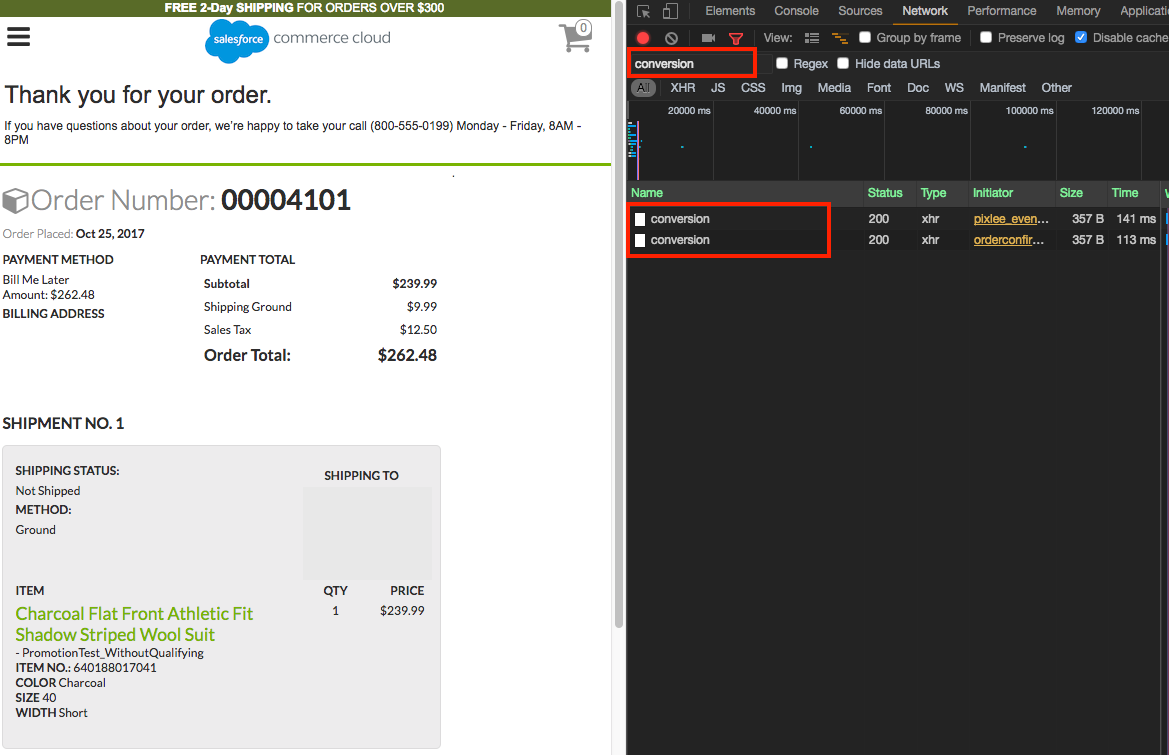
- If you do not see conversion calls like in the screenshot, please revisit Analytics Setup or contact us here.
Updated 8 months ago